In this block, we will consider two regions of the body, the abdomen and pelvis, and the anatomy of the internal organs found there. Although often considered separately, the abdomen and pelvis form the largest effectively continuous visceral cavity of the body (abdominopelvic cavity). They act together to provide multiple vital functions including: support and protection of the digestive and urinary tracts and internal reproductive organs and their associated neurovascular supplies; transmission of the neurovascular supply to and from the thorax and the lower limb; provision of support and attachment to the external genitalia and access to and from the internal reproductive and urinary organs; provision of accessory muscles of physiological actions such as respiration, defecation, and micturition; support for the spinal column in weight bearing and movement.
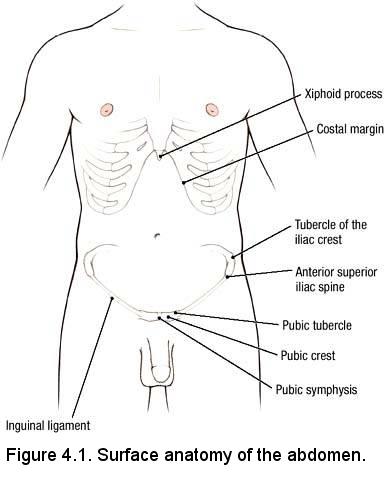
- Xiphoid process
- Costal margin
- Pubic symphysis
- Pubic crest
- Pubic tubercle
- Anterior superior iliac spine
- Tubercle of the iliac crest
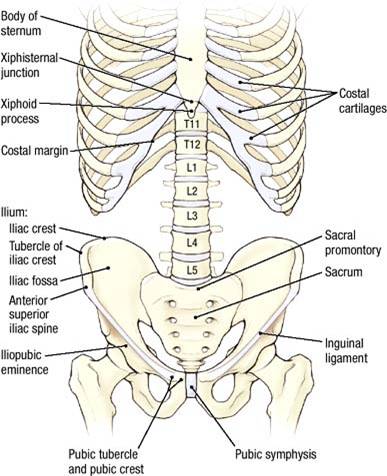
- Xiphisternal junction
- Xiphoid process
- Costal margin
- Pubic symphysis
- Pubic crest
- Pubic tubercle
- Anterior superior iliac spine
- Iliac crest
- Tubercle of the iliac crest
LEARNING OBJECTIVES: After completion of this session, the student will be able to:
- Recall the basic terminology used to define the surface representations of the quadrants and regions of the abdomen.
- Define the innervation, blood supply, and lymphatic drainage of the anterior abdominal wall.
- Describe the formation of the rectus sheath.
- Describe the layers of the anterolateral abdominal wall.
Dissection Overview: Skin Incisions and Superficial Fascia
The contents of the abdominal cavity are protected by the anterolateral abdominal wall.
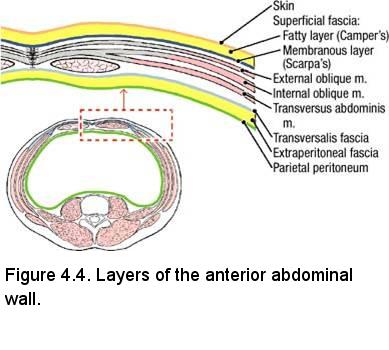
The organization of the layers forming the anterolateral abdominal wall is illustrated in Figure 4.4. The superficial fascia is unique in this
region in that it has a superficial fatty layer called Camper's fascia and a deep membranous layer called Scarpa's fascia. The membranous layer is noteworthy, because it is continuous with the Dartos and Colles' fasciae in the perineum.
Dissection Instructions: Skin Incisions and Superficial Fascia
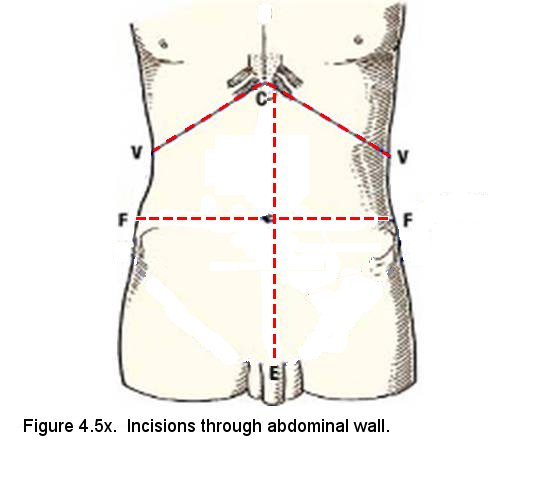
- Make a midline skin incision from the xiphisternal junction (C) to 3 cm below the pubic crest (E), encircling the umbilicus.
- Make an incision from the xiphoid process (C) along the costal margin to a point on the midaxillary line (V).
- Make a skin incision beginning 3 cm below the pubic crest (E). Extend this incision laterally, 3 cm inferior to the inguinal ligament to a point 3 cm below the anterior superior iliac spine (ASIS). Continue the incision laterally, 3 cm below the iliac crest to a point on the midaxillary line (F).
- Reflect the skin flaps and superficial fascia laterally; BUT LEAVE a "button" of superficial fascia adhered to the aponeurosis of the external abdominal oblique. The "button" should be about 7.5 cm lateral to the midline and should be 10 cm (3-4 in) in diameter. The superficial epigastric artery and vein are in the superficial fascia in this area. If you see them, fine, but do not make a special effort to find them.
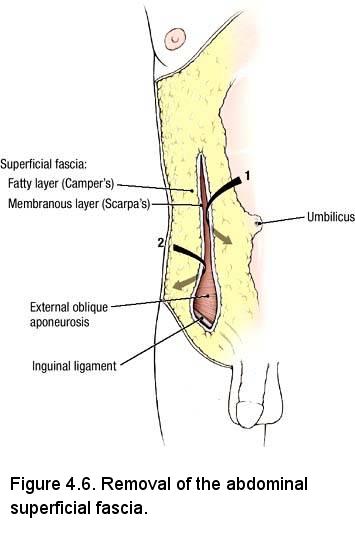
- Observe that the deep surface of your "button" is fibrous connective tissue containing relatively little fat (Scarpa's fascia) and the more superficial part is composed entirely of fat (Camper's fascia) (Figure 4.6, arrow 1)..
- As you reflect the skin flaps at the midline, you may come upon the anterior cutaneous branches of intercostal nerves (T7 to T11), the subcostal nerve (T12), and the iliohypogastric and ilioinguinal nerves (L1) that enter the superficial fascia about 2 to 3 cm lateral to the midline. Preserve one or two examples of anterior cutaneous branches if found, but do not make a special effort to find them. Consult a dermatome chart and recall that:
- T7 innervates the skin overlying the tip of the xiphoid process.
- T10 innervates the skin of the umbilicus.
- T12 innervates the skin superior to the pubic symphysis.
- L1 innervates the skin overlying the pubic symphysis.
- Lateral to the incision, use your fingers to separate the superficial fascia from the external abdominal oblique muscle (Figure 4.6, arrow 2). As you near the midaxillary line, palpate the lateral cutaneous branches of the intercostal and subcostal nerves entering the superficial fascia.
- Remove the superficial fascia in an inferior direction until the lower border of the external abdominal oblique muscle is exposed (approximately 2.5 cm into the proximal thigh).
IN THE CLINIC: Superficial Veins of the Abdominal Wall
The superficial epigastric vein anastomoses with the lateral thoracic vein in the superficial fascia. This is an important collateral venous channel from the femoral vein to the axillary vein. In patients who have an obstruction of the inferior vena cava or hepatic portal vein, the superficial veins of the abdominal wall may be engorged, and may become visible around the umbilicus (caput medusae).
The superficial epigastric vein anastomoses with the lateral thoracic vein in the superficial fascia. This is an important collateral venous channel from the femoral vein to the axillary vein. In patients who have an obstruction of the inferior vena cava or hepatic portal vein, the superficial veins of the abdominal wall may be engorged, and may become visible around the umbilicus (caput medusae).
Dissection Overview: Muscles of the Anterolateral Abdominal Wall
The order of dissection will be as follows: The three flat muscles of the abdominal wall will be studied. The composition and contents of the rectus sheath will be explored. The anterior abdominal wall will be reflected.
Dissection Instructions: External Abdominal Oblique Muscle
- Reflect or remove any remnants of the superficial fascia from the surface of the external abdominal oblique muscle and place them in the tissue container (keep your "button" on one side for peer teaching, if possible).
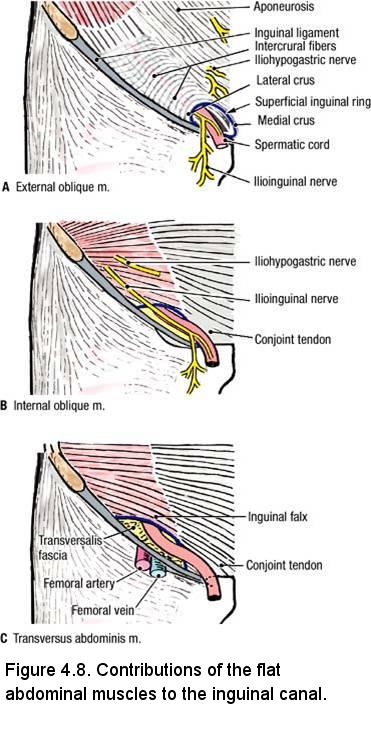
- The external abdominal oblique muscle forms the most superficial portion of the inguinal canal (Figure 4.8A). The proximal attachments of the external abdominal oblique muscle are the external surfaces of the lower ribs (ribs 5 to 12). The distal attachments of the external abdominal oblique muscle are the linea alba, pubic tubercle, and anterior half of the iliac crest. Observe that the fibers of the external abdominal oblique muscle course from superolateral to inferomedial.
- Clean off the surface and define the medial borders of the external abdominal oblique muscle. Gentle scraping motions with a dull scalpel blade yield good results. To avoid damage to the inguinal canal, work at and above the intercristal line. This is to protect the spermatic cord (or round ligament of the uterus) where it emerges from the superficial inguinal ring.
Dissection Instructions: Internal Abdominal Oblique Muscle
The internal abdominal oblique muscle lies deep to the external abdominal oblique muscle. The internal abdominal oblique muscle forms the intermediate layer of the inguinal canal (Figure 4.8B). To expose the internal abdominal oblique muscle, the external abdominal oblique muscle must be transected and reflected. Perform this transection bilaterally.
- At the intersection of the midaxillary line and transumbilical plane (point A in Figure), use scissors and forceps to separate the fibers of the external abdominal oblique muscle along their directional line. Identify the fibers of the underlying internal abdominal oblique muscle coursing in the opposite direction. Insert your finger into the opening and direct it superiorly to create space between the external abdominal oblique muscle and the underlying internal abdominal oblique muscle. Then use scissors to make a transverse cut that extends from the midaxillary line to the medial border (i.e. semilunar line) of the external abdominal oblique muscle (Cut 2 in Figure).
- Use blunt dissection to separate the fibers of the external abdominal oblique muscle from the underlying internal abdominal oblique muscle. Note that your fingers cannot pass medial to the semilunar line because the external abdominal oblique aponeurosis is fused to the internal abdominal oblique aponeurosis to form the anterior lamina of the rectus sheath (described later).
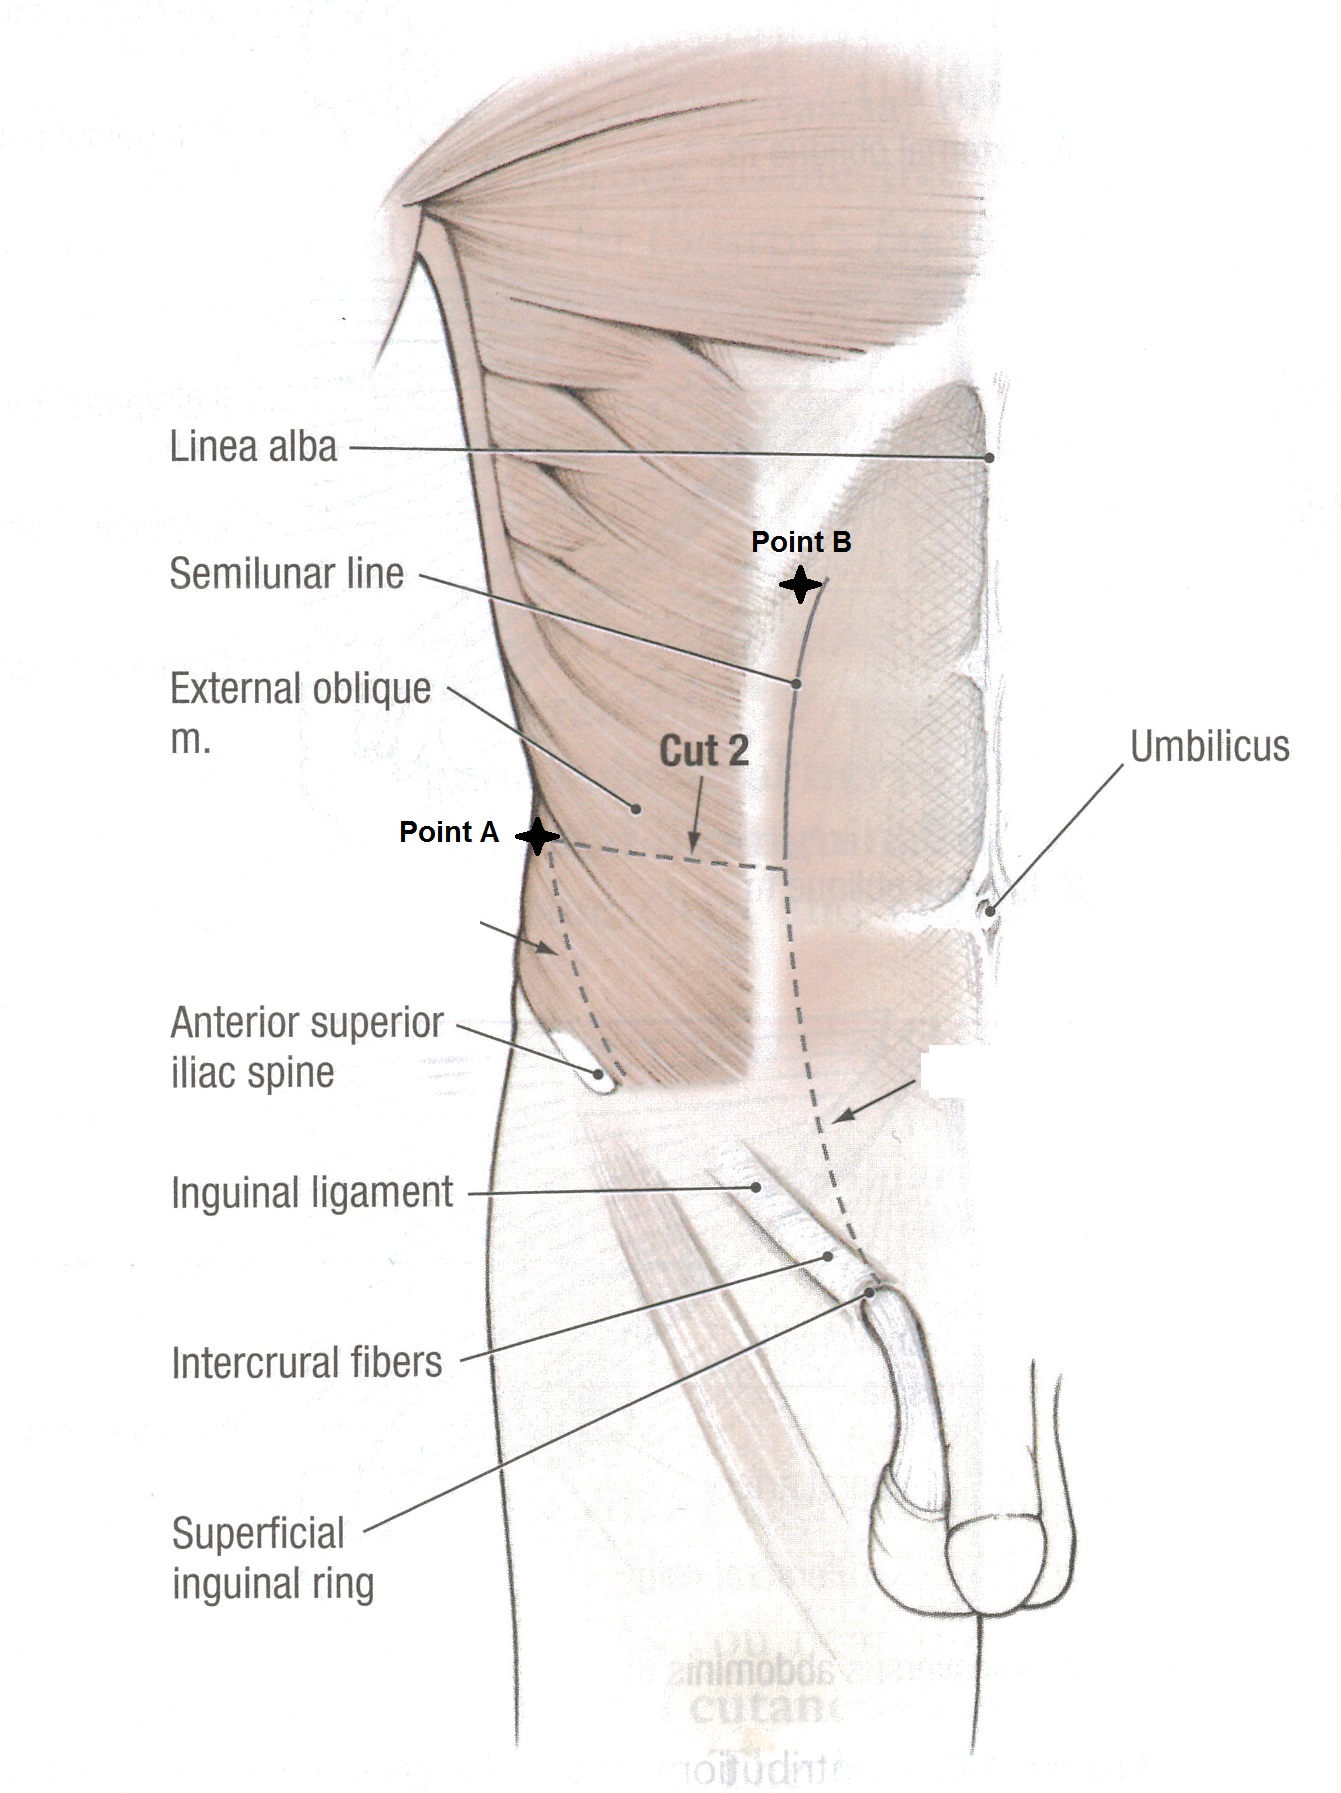
- Use scissors to cut superiorly following the medial border of the external abdominal oblique muscle (point B in Figure) and reflect it superolaterally. Separate the external abdominal oblique muscle from the internal abdominal oblique muscle as needed, to sufficiently expose the internal abdominal oblique muscle.
Dissection Instructions: Transversus Abdominis Muscle
The transversus abdominis muscle lies deep to the internal abdominal oblique muscle. The transversus abdominis muscle contributes to the deepest layer of the inguinal canal (Figure 4.8C). In the inguinal region the transversus abdominis muscle has attachments and fiber directions that are similar to the internal abdominal oblique muscle.
Use an illustration to study the proximal attachments, distal attachments, and fiber direction of the transversus abdominis muscle. The proximal attachments of the transversus abdominis muscle are the internal surfaces of the lower costal cartilages (of ribs 7 to 12), the thoracolumbar fascia, the iliac crest, and the lateral third of the inguinal ligament. The distal attachments of the transversus abdominis muscle are the linea alba, the pubic crest, and the pecten pubis.
- Superiorly, just inferior to the ribs, a blunt probe can be used to separate the fibers of internal abdominal oblique to view the transversus abdominus muscle. Open the incision with your fingers and with blunt dissection in the plane between these two muscles, separate them as far medially and inferiorly as possible (without enlarging the incision).
Dissection Instructions: Rectus Abdominis Muscle
- Reposition the internal abdominal oblique and external abdominal oblique muscles. The following cuts should be made bilaterally.
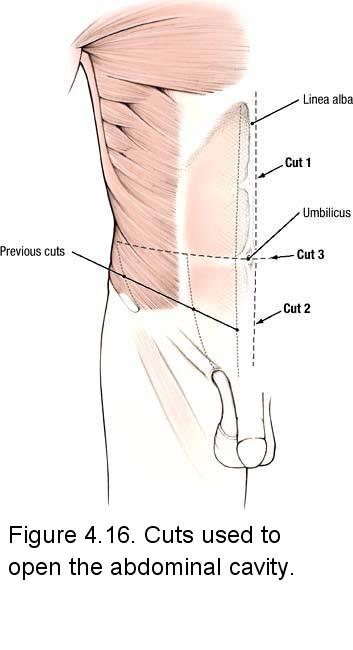
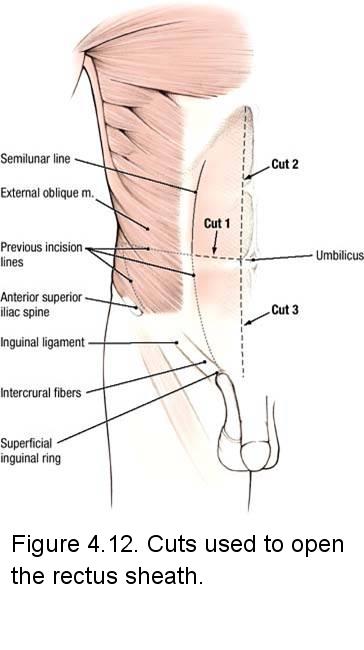
- Use scissors to make a transverse incision through the anterior wall of the rectus sheath (through the aponeuroses superficial to the rectus abdominis muscle) at the level of the umbilicus (Figure 4.12, cut 1). Begin the cut approximately 2.5 cm lateral to the umbilicus and continue it laterally as far as the semilunar line.
- Use scissors to cut the rectus sheath along the medial border of the right rectus abdominis muscle (Figure 4.12, cut 2). This incision should extend in a superior direction, about 2.5 cm from the midline. Stop at the costal margin.
- Extend the vertical incision inferiorly along the medial border of the rectus abdominis muscle (Figure 4.12, cut 3). Cut 3 should be about 1.2 cm from the midline and stop at the pubic crest.
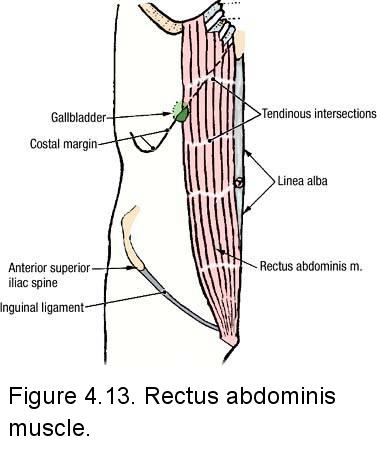
- Insert your fingers into the vertical incision and bluntly dissect the anterior wall of the rectus sheath from the anterior surface of the rectus abdominis muscle. Observe that the anterior wall of the rectus sheath is firmly attached to the anterior surface of the rectus muscle by several tendinous intersections (Figure 4.13). Insert scissors between the rectus sheath and the anterior surface of the rectus abdominis muscle and cut the tendinous intersections to free the rectus sheath from the rectus abdominis muscle.
- Observe the rectus abdominis muscle (Figure 4.13). The inferior attachment of the rectus abdominis muscle is the symphysis and body of the pubis. The superior attachment of the rectus abdominis muscle is on the costal cartilages (ribs 5 to 7). The rectus abdominis muscle flexes the trunk.
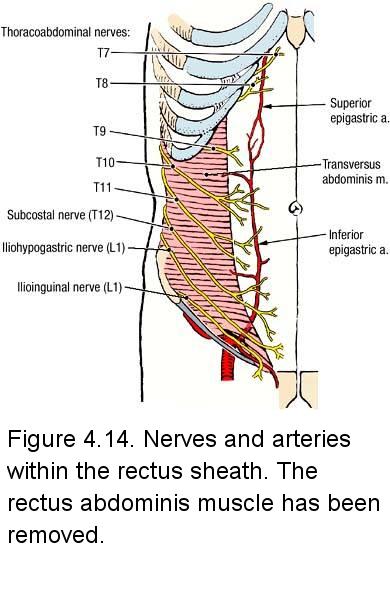
- Find a number of the branches of six nerves (T7 to T12) that enter the lateral side of the rectus sheath (Figure 4.14). These nerves innervate the rectus abdominis muscle and then emerge as the anterior cutaneous branches of the intercostal and subcostal nerves.
- Use your fingers to mobilize the medial border of the rectus abdominis muscle (Figure 4.13). At the level of the umbilicus, transect the rectus abdominis muscle with scissors. Reflect the two halves superiorly and inferiorly, respectively. Only reflect the inferior half as far as the 3 cm below the intercristal line. If the nerves prevent full reflection of the rectus abdominis muscle, cut them along the lateral border of the muscle.
- Observe two sets of vessels on the deep surface of the rectus abdominis muscle (Figure 4.14):
- Superior epigastric artery and vein - on the superior half of the rectus abdominis muscle - If necessary, look for the superior epigastric artery at the xiphisternal junction.
- Inferior epigastric artery and vein - on the inferior half of the rectus abdominis muscle - This artery may dive into the muscle early and not be visible. Study Figure XX to understand the anastomosis between these arteries. This anastomosis forms a functional interconnection between the arteries that serve the upper and lower limbs.
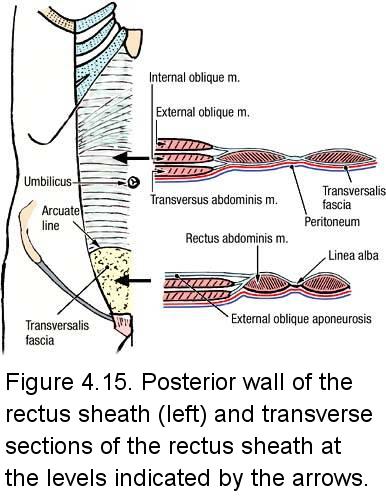
- Examine the posterior layer of the rectus sheath (Figure 4.15, left), formed by aponeuroses of the internal abdominal oblique and transversus abdominis muscles (Figure 4.15, right).
- Identify the arcuate line (Figure 4.15, left), which is located midway between the pubic symphysis and the umbilicus. The arcuate line is the inferior limit of the posterior layer of the rectus sheath, and it may be indistinct. At the level of the arcuate line, the inferior epigastric vessels enter the rectus sheath.
- Inferior to the arcuate line, the fused aponeuroses of all 3 flat abdominal muscles pass anterior to the rectus abdominis muscle (Figure 4.15, right).
- Inferior to the arcuate line, observe the transversalis fascia. Deep to the transversalis fascia observe a thin layer of extraperitoneal fascia and the parietal peritoneum (Figure 4.15, right).
- In the midline, identify the linea alba. The linea alba is formed by the fusion of the aponeuroses of the right and left flat abdominal muscles (external abdominal oblique, internal abdominal oblique, and transversus abdominis).
IN THE CLINIC: Epigastric Anastomoses
The superior epigastric vessels anastomose with the inferior epigastric vessels within the rectus sheath (Figure 4.14). If the inferior vena cava becomes obstructed, the anastomosis between the inferior epigastric and superior epigastric veins provides a collateral venous channel that drains into the superior vena cava. If the aorta is occluded, collateral arterial circulation to the lower part of the body occurs through the superior and inferior epigastric arteries.
The superior epigastric vessels anastomose with the inferior epigastric vessels within the rectus sheath (Figure 4.14). If the inferior vena cava becomes obstructed, the anastomosis between the inferior epigastric and superior epigastric veins provides a collateral venous channel that drains into the superior vena cava. If the aorta is occluded, collateral arterial circulation to the lower part of the body occurs through the superior and inferior epigastric arteries.
Dissection Review:
- Use an illustration to review the distribution of the superficial epigastric vessels.
- Review the abdominal distribution of the ventral rami of spinal nerves T7 to L1.
- Replace the muscles of the anterior abdominal wall in their correct anatomical positions.
- Review the proximal attachment, distal attachment, and action of each muscle.
- Review the structures that form the nine layers of the abdominal wall (Figure 4.4).
- Use the dissected specimen to review the rectus sheath at the level of the umbilicus and just superior to the pubic symphysis (Figure 4.15).
- Review the nerve supply to the anterior abdominal wall. Review the blood supply to the anterior abdominal wall.
LEARNING OBJECTIVES: After completion of this session, the student will be able to:
- Name the four quadrants in a supine lying patient without having to turn your back to him or her.
- Describe the attachments and contents of the falciform ligament.
- Describe the contents of the median, medial and lateral umbilical folds.
- Describe the basic organization of the peritoneum and peritoneal cavity, including subdivisions.
- Describe the organization of the digestive tract and its parts.
- Identify the parts of the stomach and describe its spatial relationships to surrounding organs and mesenteries.
- Identify the parts of the large and small intestines.
- Identify external features of the large intestine.
- Correctly describe each abdominal organ as intraperitoneal or retroperitoneal.
- Identify named peritoneal structures including mesenteries and ligaments.
- Describe the anatomy of the foregut peritoneal ligaments, omenta and omental bursa, and their development from the embryological ventral and dorsal mesogastria.
- Describe the peritoneal relationships of the liver and gallbladder.
Dissection Overview: Reflection of the Abdominal Wall
The contents of the abdominal cavity are protected by the anterior abdominal wall. The incision lines will be similar to the quadrant lines. The incisions are designed to give direct reference to the position of the abdominal organs within the abdominal quadrants.
The order of dissection will be as follows: The anterior abdominal wall will be incised and opened. The inner surface of the anterior abdominal wall will be studied.
Dissection Instructions: Reflection of the Abdominal Wall
- Refer to Figure 4.5x. Push a scalpel blade through the abdominal wall, 1 cm directly to the left of the umbilicus. Push just until there is some "give", indicating that the scalpel blade has pushed through the parietal peritoneum into the peritoneal cavity. Preserve all components of the inguinal canal.
- Insert your finger through the incision into the peritoneal cavity. Pull the abdominal wall anteriorly to create a space between the abdominal wall and the abdominal viscera.
- Staying 1 cm to the left of the midline to preserve the falciform ligament, extend the vertical incision superiorly along the linea alba to the xiphisternal junction (point C).
- Staying 1 cm to the left of the midline to preserve the median umbilical fold, extend the vertical incision inferiorly along the linea alba to the pubic crest (point E).
- On the right side, make an incision through the abdominal wall coinciding with the transumbilical plane. This incision should pass through the umbilicus. Extend this cut to the right midaxillary line (point F).
- On the left side, make an incision through the abdominal wall coinciding with the transumbilical plane. Extend this incision to the left midaxillary line (point F).
- Beginning at point C, make an incision through the abdominal wall, cutting directly inferior to the costal margins. Lift the flap from its inferior edge to assure you're not cutting too deeply and damaging the abdominal organs. Extend this incision along the costal margins to the midaxillary line on each side (points V).
- Reflect the abdominal wall flaps to open the peritoneal cavity.
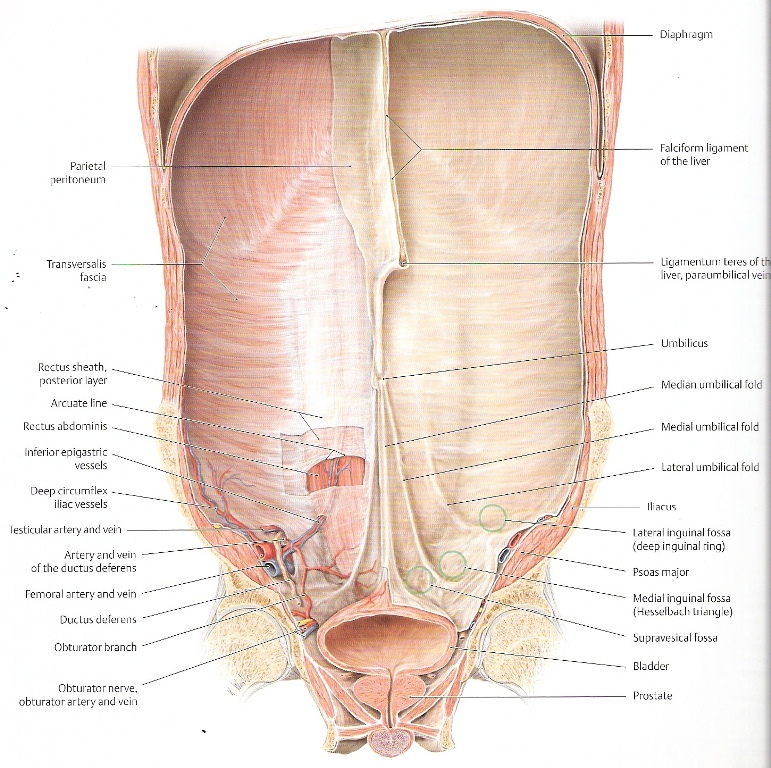
- Identify the falciform ligament on the inner surface of the right upper quadrant flap (Figure 5.8). The falciform ligament connects the anterior abdominal wall to the surface of the liver.
- If the right upper quadrant flap does not reflect easily, cut the falciform ligament from the abdominal wall, leaving it attached to the liver.
- On the inner surface of the lower abdominal wall, identify five folds (Figure 5.8, right side):
- Median umbilical fold - in the midline inferior to the umbilicus. It should be attached to the right lower quadrant flap, but may have been cut longitudinally. The median umbilical fold contains the urachus (obliterated allantoic duct). The median umbilical fold extends from the apex of the urinary bladder to the umbilicus.
- Medial umbilical folds (right and left) - located lateral to the median umbilical fold. The medial umbilical folds contain the obliterated umbilical arteries. The medial umbilical folds extend superiorly to the umbilicus (their inferior origin will be studied when you learn the branches of the internal iliac artery).
- Lateral umbilical folds (right and left) - located lateral to the medial umbilical folds. The lateral umbilical folds overlie the inferior epigastric arteries and veins. The lateral umbilical folds extend toward the umbilicus, but not to it. The inferior epigastric vessels, contained within the lateral umbilical folds, anastomose with the superior epigastric vessels within the rectus sheath.
- Lateral to the lateral umbilical folds, observe small depressions that mark the location of the deep inguinal rings.
Dissection Overview: Exploration of the Abdominal Cavity
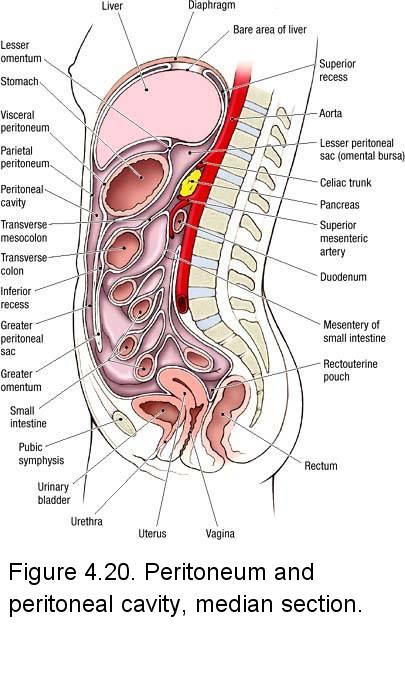
During development, some organs invaginated into the closed sac containing the peritoneal cavity and, as a result, are almost completely covered with visceral peritoneum, except for a bare area where their mesentery attaches (Figure 4.20). These organs are relatively mobile and are called intraperitoneal organs (peritoneal organs). Intraperitoneal organs are suspended from the posterior abdominal wall by a double-layered bridge of peritoneum called a mesentery (the mesenteries of organs are generally named by preceding the organ's name with the prefix 'meso-'). The mesenteries provide a path through which blood vessels, lymphatic ducts, and nerves, which originate from the posterior abdominal wall, can reach the intraperitoneal organ. Examples of intraperitoneal organs include the stomach, small intestine, liver, and spleen.
Some organs develop behind the peritoneum and are called retroperitoneal (extraperitoneal) organs: The ureters, suprarenal glands, and kidneys are examples. Some parts of the gastrointestinal tract begin as intraperitoneal organs and then become attached to the abdominal wall during development. These organs are secondarily retroperitoneal. Secondarily retroperitoneal organs include: most of the duodenum, the pancreas, most of the ascending colon, and the descending colon.
The abdominal viscera will be identified and localized by abdominal quadrant. The named specializations of the peritoneum will be studied.
Dissection Instructions: Abdominal Viscera
- Open the flaps of the abdominal wall. The incision lines correlate to the abdominal quadrant lines. As you examine the organs, you should close and open the flaps to help you relate the organs to the abdominal quadrants. Most of the organs to be identified are parts of the gastrointestinal tract.
- Use your hands to inspect the abdominal cavity. As you perform the inspection, you may encounter adhesions (fusion of adjacent organs to each other or fusion of an organ with the abdominal wall). If adhesions are present, tear them with your fingers to mobilize the organs.
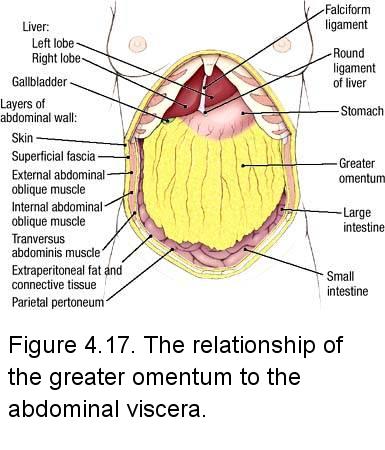
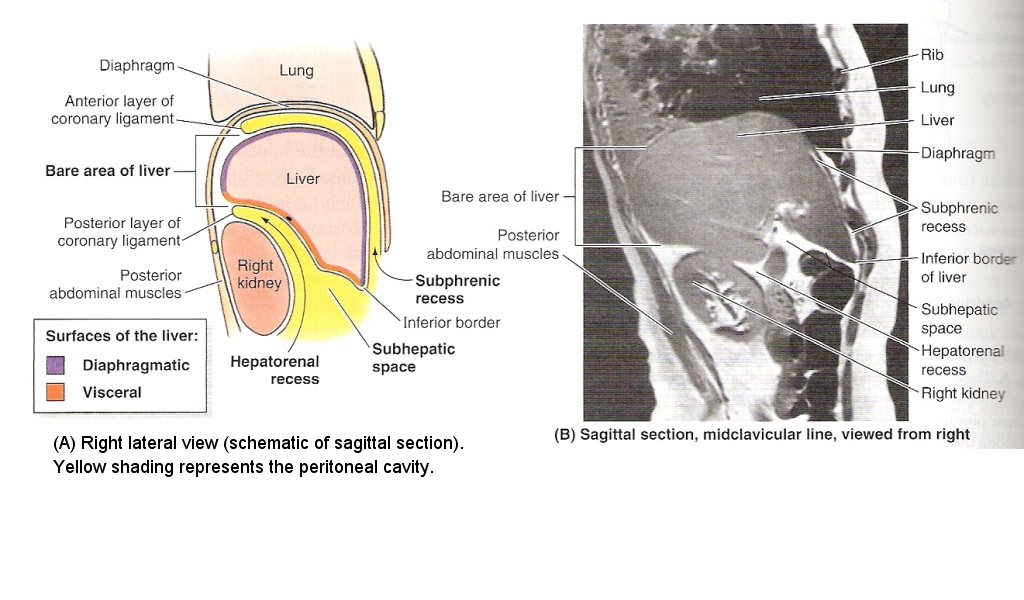
- Identify the liver (Figure 4.17). It is an intraperitoneal organ. The liver occupies the right upper quadrant and extends across the midline into the left upper quadrant. The liver lies against the inferior surface of the diaphragm, separated from it by a potential space called the subphrenic recess (Figure 2.63). The attachment of the falciform ligament divides the liver into right and left anatomical lobes (Figure 2.64).
- The gallbladder (Figure 4.17), an intraperitoneal organ, is also in the right upper quadrant. The gallbladder extends below the inferior border of the liver. It is usually found at the tip of the right ninth costal cartilage in the midclavicular line (review Murphy's sign). Confirm this relationship.
- Identify the stomach (Figure 4.17). It is an intraperitoneal organ and lies in the left upper quadrant. It is continuous with the esophagus proximally and the duodenum distally. The liver partially covers the anterior surface of the stomach.
- Find the spleen. It is an intraperitoneal organ that lies in the left upper quadrant. It is found posterior to the stomach and may be difficult to find unless it is enlarged. Reach around the left side of the stomach with your right hand and palpate the spleen.
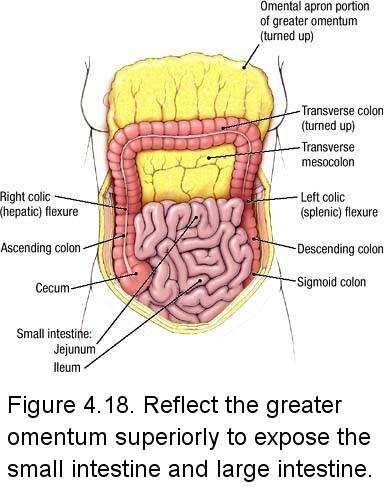
- Identify the greater omentum (Figure 4.17). The greater omentum may be thin and filmy or thick and fatty. It is attached to the greater curvature of the stomach (Figure 4.22) and to the transverse colon. Reflect the greater omentum superiorly over the costal margin (Figure 4.18).
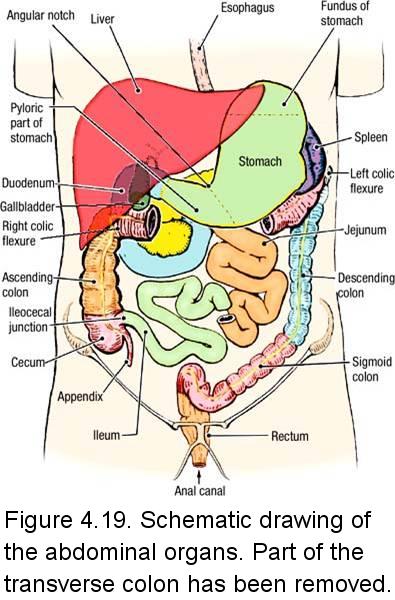
- Identify the small intestine (Figures 4.18 and 4.19). The small intestine begins at the pyloric end of the stomach. It has three parts:
- Duodenum
- Jejunum
- Ileum (note the spelling with an e. Ilium or Iliac, with an i, are references to a bone)
- Most of the duodenum is secondarily retroperitoneal (it is briefly intraperitoneal where it is continuous with the stomach proximally, and the jejunum distally). It will be studied with the pancreas.
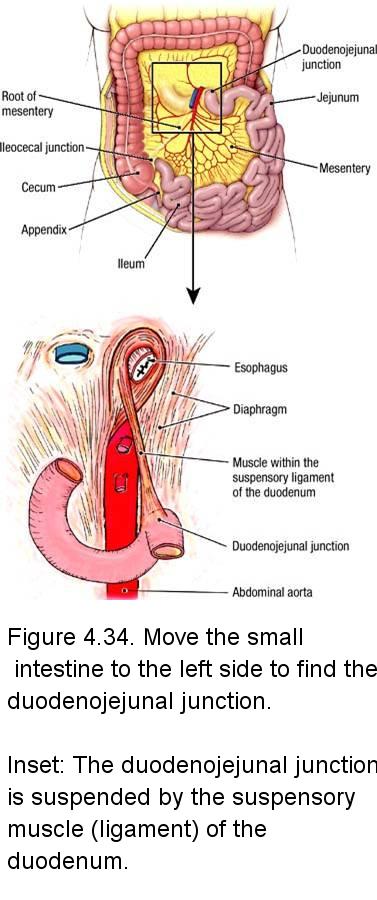
- The jejunum and ileum are intraperitoneal organs that extend from the left upper quadrant to the right lower quadrant, but due to their length and mobility, they occupy all four quadrants. Move the small intestine to the left side of the abdominal cavity and follow the jejunum proximally (Figure 4.34). Find the duodenojejunal junction where the small intestine transitions from retroperitoneal to intraperitoneal.
- Beginning in the left upper quadrant, pass the jejunum and ileum between your hands and appreciate their length, position, and termination. Note that the wall of the jejunum is thicker than the wall of the ileum.
- Identify the termination of the ileum where it empties into the cecum at the ileocecal junction (Figure 4.34).
- Identify the large intestine. The large intestine begins in the right lower quadrant at the ileocecal junction (Figure 4.19). The large intestine has seven parts:
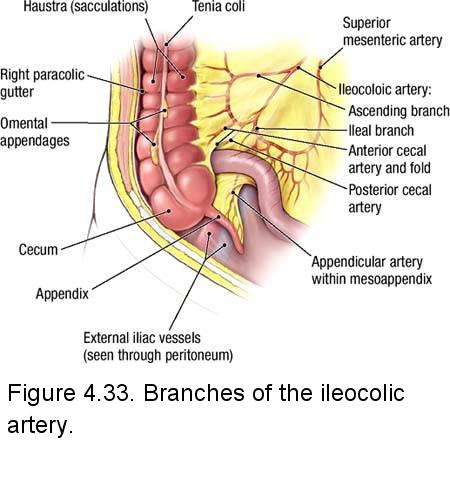
- Cecum (L. caecus, blind) - located in the right lower quadrant (Figure 4.33). The appendix (vermiform appendix) (L. appendere, to hang on) is attached to the inferior end of the cecum. The appendix may be found in one of several positions (Figure 4.36).
- Ascending colon extends from the cecum to the right colic flexure (hepatic flexure) (in the right upper quadrant) (Figure 4.19). The ascending colon is secondarily retroperitoneal.
- Transverse colon extends from the right colic flexure to the left colic flexure (splenic flexure) (in the left upper quadrant). Observe that the left colic flexure is at a more superior level than the right colic flexure due to inferior displacement of the right colic flexure by the liver. The transverse colon is intraperitoneal and freely moveable.
- Descending colon extends from the left colic flexure in the left upper quadrant to its junction with the sigmoid colon in the left lower quadrant. The descending colon is secondarily retroperitoneal.
- Sigmoid colon - located in the left lower quadrant. The sigmoid colon ends in the pelvic cavity at the level of the third sacral vertebra where it becomes continuous with the rectum. The sigmoid colon is an intraperitoneal organ.
- Rectum - contained entirely within the pelvic cavity. The rectum will be studied with the pelvic viscera.
- Anal Canal - will be studied with the perineum.
- Use your hands to trace the large intestine from the right lower quadrant to the left lower quadrant. Note the position (quadrant) and mobility of each of its parts.

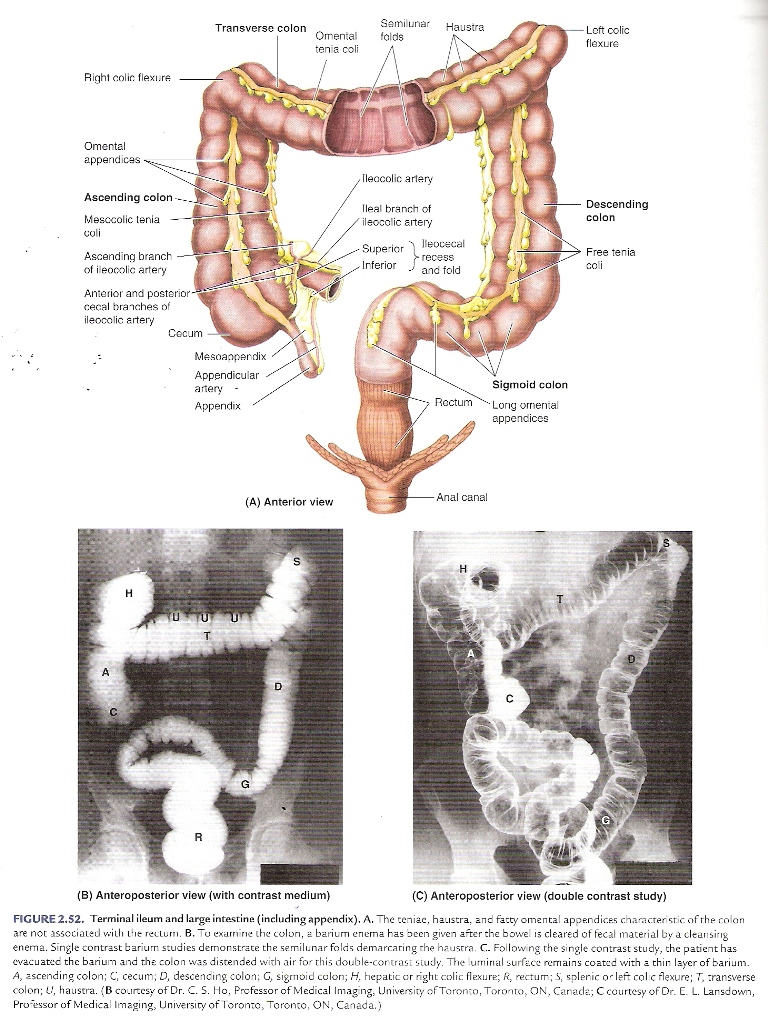
- Observe the external surface of the large intestine and note three features that distinguish it from the small intestine (Figure 2.52):
- Teniae coli - three narrow bands of longitudinal muscle -only one band is visible anteriorly
- Haustra - outpouchings of the wall of the colon
- Omental (epiploic) appendices - small accumulations of fat covered by visceral peritoneum
Dissection Instructions: Peritoneum
- Observe the visceral peritoneum on the surface of the stomach or small intestine (Figure 4.20). Note that visceral peritoneum is smooth and slippery.
- Observe the parietal peritoneum on the inner surface of the abdominal wall (Figure 4.20). Note that parietal peritoneum is also smooth and slippery.
- Observe the greater omentum (Figure 4.17). Spread this apron-like structure to appreciate its size. The greater omentum normally lies between the intestines and the anterior abdominal wall (Figure 4.20).
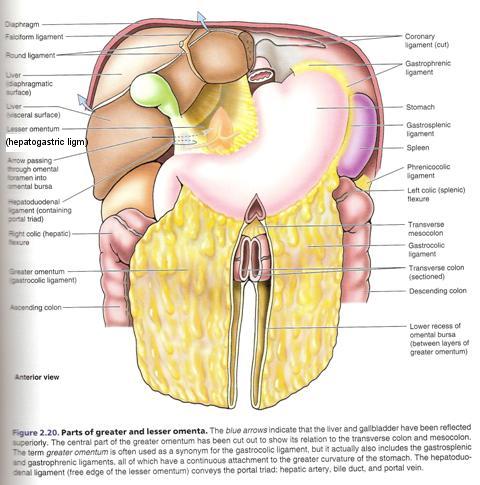
- Elevate the inferior border of the liver and identify the lesser omentum
(Figure 4.20 for sagittal; Figure 2.20 for anterior view). The lesser omentum passes from the
lesser curvature of the stomach and first part of the duodenum (Figure 4.22) to the inferior surface of the liver. The lesser omentum has two parts (Figure 2.20):
- Hepatogastric ligament extends from the liver to the lesser curvature of the stomach.
- Hepatoduodenal ligament extends from the liver to the first part of the duodenum.
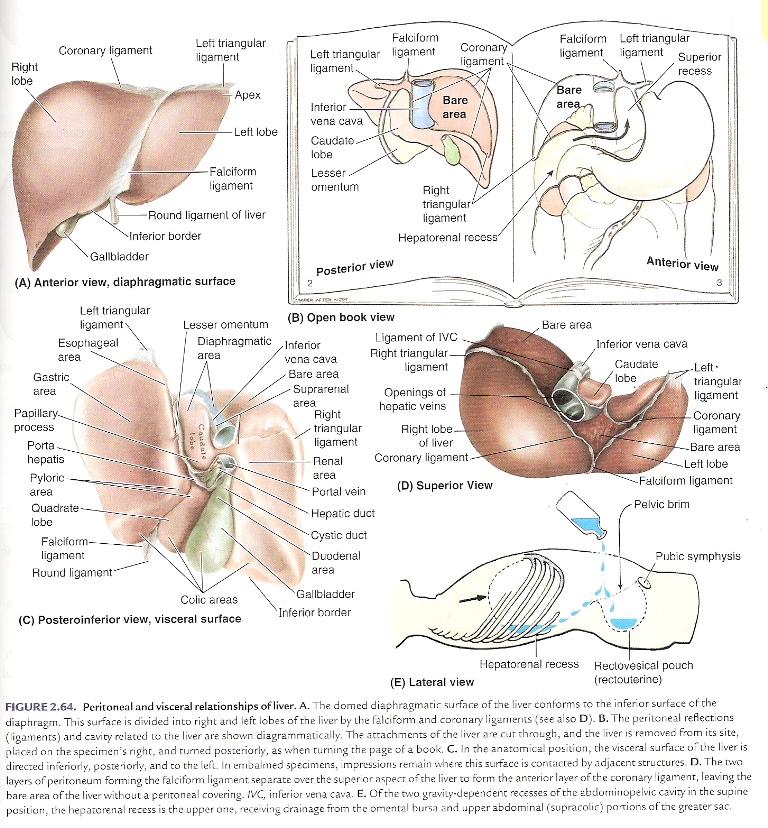
- Return the right upper quadrant flap to its anatomical position and review the falciform ligament (Figure 2.20). The falciform ligament passes from the parietal peritoneum on the anterior abdominal wall to the visceral peritoneum on the surface of the liver (Figure 5.8). The round ligament of the liver (ligamentum teres hepatis) is the obliterated umbilical vein, and it is found in the inferior free margin of the falciform ligament.
- Follow the falciform ligament superiorly and observe that it is one part of the coronary ligament
(Figure 2.20) that attaches the liver to the diaphragm. Note that the falciform ligament separates the subphrenic
recess into left and right spaces (Figure 2.64).
Pass your hand into the subphrenic recess on either side of the falciform ligament and confirm that the posterior
boundary of the subphrenic recess is the anterior layer of the coronary ligament (Figure 2.63).

- Two additional peritoneal ligaments are also parts of the coronary ligament (Figure 2.64):
- Left triangular ligament - located between the left lobe of the liver and the diaphragm. Run your hand to the left along the coronary ligament until you encounter a free edge. This is the left triangular ligament, which is a reflection between the anterior and posterior layers of the coronary ligament.
- Right triangular ligament - located between the right lobe of the liver and the diaphragm. Run your hand to the right along the coronary ligament until you encounter a free edge (this will occur along the right side of the liver). This is the right triangular ligament, which is a reflection between the anterior and posterior layers of the coronary ligament.
- The gastrophrenic ligament connects the superior part of the greater curvature of the stomach to the diaphragm. Slide your hand superiorly to the left of the stomach to feel this ligament.
- The gastrosplenic (gastrolienal) ligament passes from the greater curvature of the stomach to the spleen, and the splenorenal (lienorenal) ligament connects the spleen to the posterior abdominal wall over the left kidney (Figure 4.21).
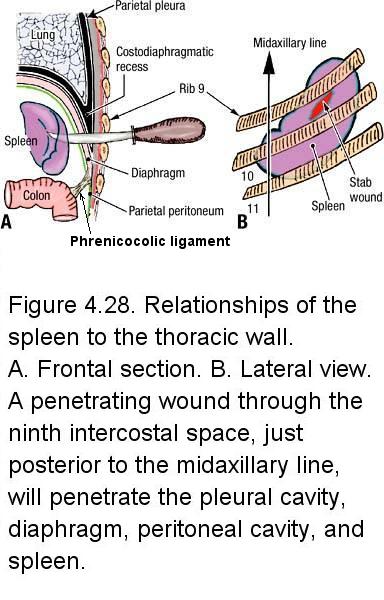
- Reflect the greater omentum superiorly over the costal margin and identify the transverse mesocolon (Figure 4.18 and Figure 4.20) The transverse mesocolon attaches the transverse colon to the posterior abdominal wall. At the left end of the transverse mesocolon is the phrenicocolic ligament (Figure 4.28), which attaches the left colic flexure to the diaphragm.
- Identify the mesentery of the small intestine (Figure 4.20). The mesentery of the small intestine suspends
the jejunum and ileum from the posterior abdominal wall. Verify that the root of the mesentery crosses the posterior
abdominal wall from the duodenojejunal junction in the left upper quadrant to the ileocecal junction in the right lower quadrant
(Figure 4.34). The root of the mesentery is about 15 cm long. The intestinal attachment of the mesentery of the small intestine is nearly 6 m long.
- The length of the cecum's mesentery and the degree of its mobility vary considerably from individual to individual. Observe the mesoappendix (Figure 4.33). The mesoappendix attaches the appendix to the posterior abdominal wall and it contains the appendicular artery.
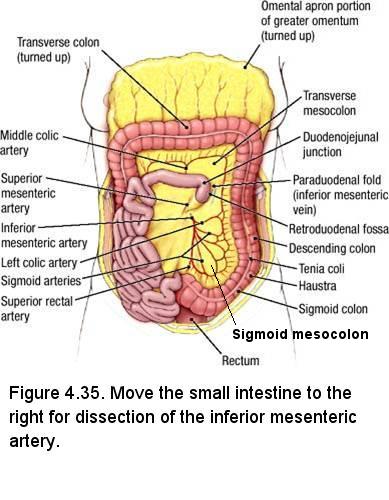
- Identify the sigmoid mesocolon in the lower left quadrant (Figure 4.35). The sigmoid mesocolon suspends the sigmoid colon from the posterior abdominal wall.
- Note that these peritoneal structures are all related to a subdivision of the peritoneal cavity called the greater peritoneal sac (Figure 4.20). Posterior to the stomach and lesser omentum is a smaller subdivision of the peritoneal cavity called the lesser peritoneal sac (omental bursa) (Figure 4.20 and Figure 4.21)
- The omental foramen (epiploic foramen, foramen of Winslow) is the opening between the greater and lesser peritoneal sacs. The omental foramen lies posterior to the hepatoduodenal ligament (Figure 4.21).
- Carefully insert your finger into the omental foramen (the structures in the hepatoduodenal ligament, directly anterior to the omental foramen, are easily damaged) and review its four boundaries:
- Anterior - The hepatoduodenal ligament investing the hepatic portal vein, hepatic artery proper, and biliary tree (Figure 4.21)
- Posterior - inferior vena cava and right crus of the diaphragm covered with parietal peritoneum
- Superior - caudate lobe of the liver covered with visceral peritoneum
- Inferior - first part of the duodenum covered with visceral peritoneum
- Study a diagram of the lesser peritoneal sac (Figure 4.20). The lowest part of the lesser peritoneal sac is called the inferior recess and it extends inferiorly as far as the greater omentum. During development, the inferior recess extended between the layers of the greater omentum (review an embryology text). The highest part of the lesser peritoneal sac is the superior recess. The diaphragm lies posterior to the superior recess and the caudate lobe of the liver is anterior to the superior recess.
- Posterior to the main part of the lesser peritoneal sac is the pancreas (Figure 4.20). The peritoneum that covers the pancreas forms part of the posterior wall of the lesser peritoneal sac.
Dissection Review
- Use the cadaver specimen to review all parts of the gastrointestinal tract in proximal to distal order. State the quadrant(s) in which each abdominal organ normally is found.
- Close and open the flaps of the abdominal wall to review the location of each part of the small and large intestines relative to the abdominal quadrant system.
- Review the relationship of each part of the small and large intestine to surrounding structures.
- Review all parts and specializations of the peritoneum.
LEARNING OBJECTIVES - After completion of this session, the student will be able to:
- Identify the branches of the superior mesenteric artery and their paths to their targets.
- Describe the relationship between the superior mesenteric artery and neighboring structures such as the pancreas, duodenum, celiac trunk, and left renal vein.
- Describe the blood supply of the abdominal midgut via branches of the superior mesenteric artery, and the basic pattern of lymphatic drainage in this region.
- Describe the pattern of common vasculature of the duodenum and pancreas.
- Trace the potential collateral blood flow between celiac and superior mesenteric arterial territories.
- Describe the characteristic differences between intestinal arteries supplying the jejunum and the ileum.
- Describe the relationship of the superior mesenteric vein with the splenic and hepatic portal veins.
- Identify the suspensory ligament of the duodenum.
- Identify the branches of the inferior mesenteric artery and their paths to their targets.
- Describe the relationship between the inferior mesenteric artery and neighboring structures such as the abdominal aorta and ureter.
- Describe the blood supply of the abdominal hindgut via branches of the inferior mesenteric artery, and the basic pattern of lymphatic drainage in this region.
- Trace the potential collateral blood flow between superior and inferior mesenteric arterial territories.
- Describe the relationship of the inferior mesenteric vein with the splenic vein.
The superior mesenteric artery is the artery that supplies the abdominal midgut, which consists of most of the duodenum, jejunum, ileum, cecum, appendix, ascending colon, and most of the transverse colon. The superior mesenteric artery also partially supplies the pancreas. The inferior mesenteric artery is the artery that supplies the abdominal hindgut, which consists of part of the transverse colon, descending colon, sigmoid colon, and rectum.
The order of dissection will be as follows: The mesentery of the small intestine will be examined. The branches of the superior mesenteric artery that supply the jejunum, ileum, cecum, ascending colon, and transverse colon will be dissected. The external features of the jejunum and ileum will be studied. The external features of the large intestine will be studied. The inferior mesenteric artery and its branches will be dissected.
Dissection Overview: Superior Mesenteric Artery
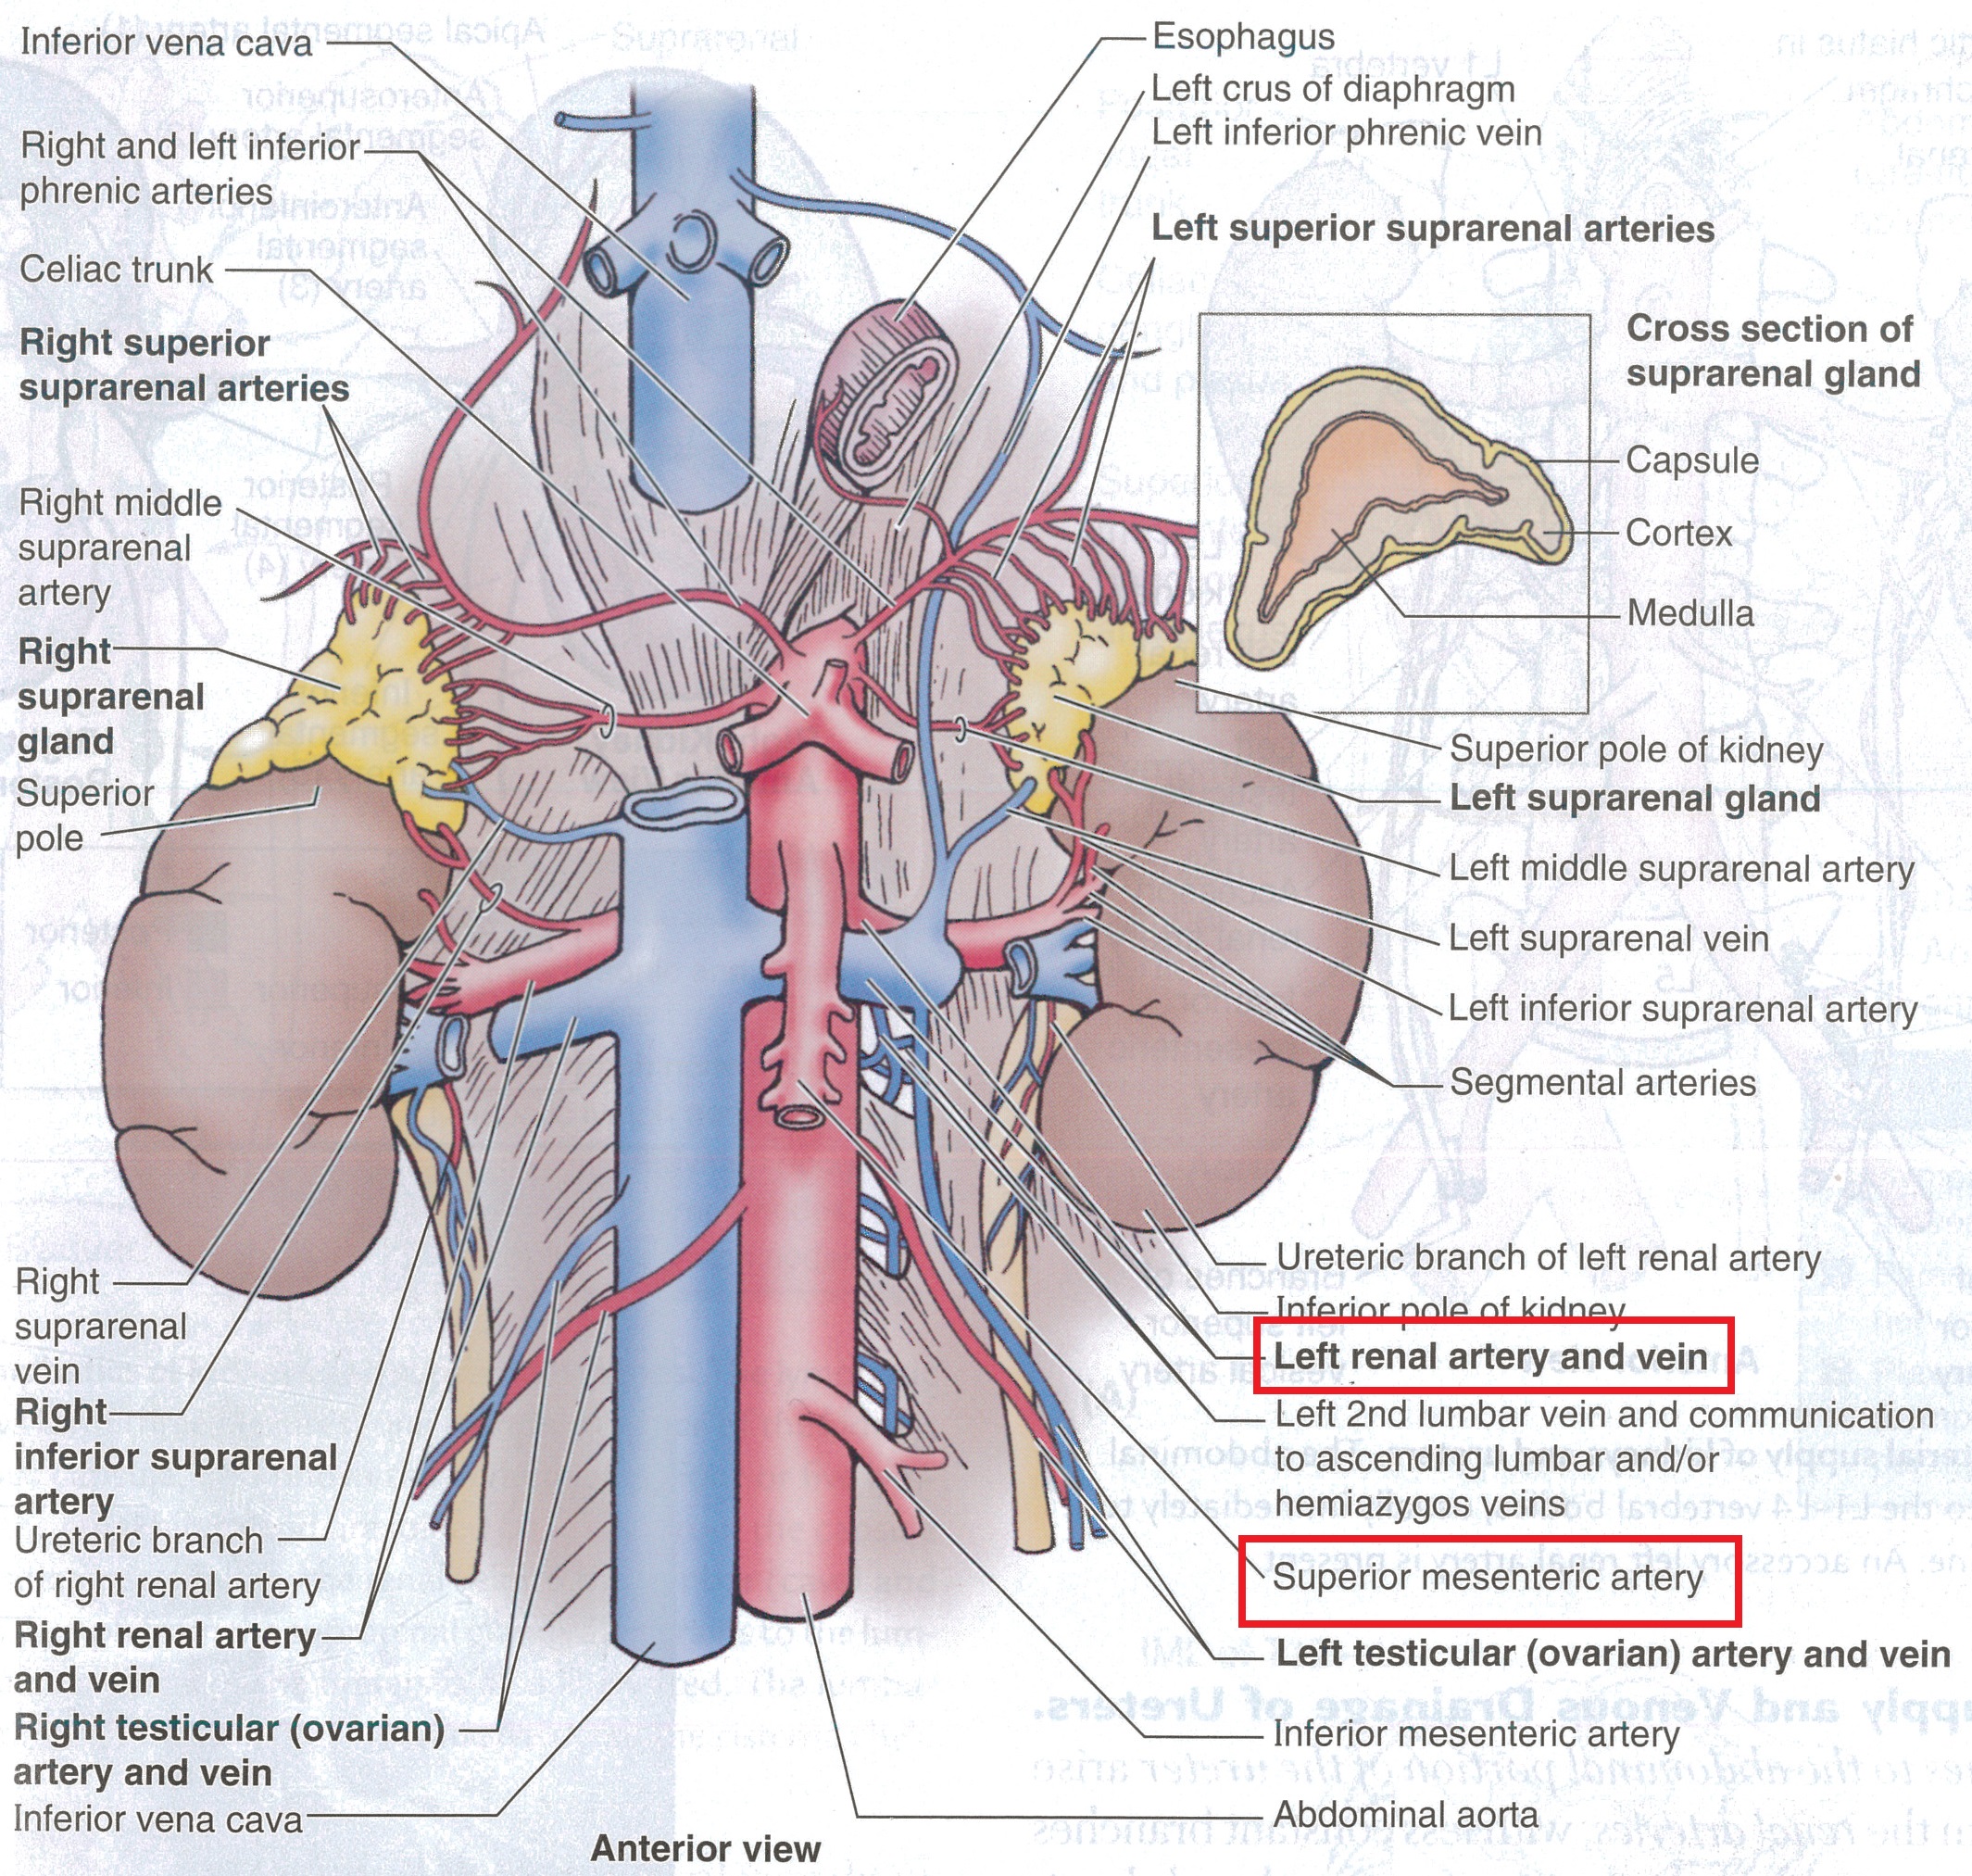
The superior mesenteric artery arises from the anterior surface of the abdominal aorta about 1 cm inferior to the celiac trunk (L1 vertebral level). At its origin, the superior mesenteric artery lies posterior to the neck of the pancreas. As the superior mesenteric artery emerges from posterior to the neck of the pancreas, it passes anterior to the uncinate process of the pancreas, the third part of the duodenum, and the left renal vein. The superior mesenteric artery then enters the mesentery of the small intestine. Within the mesentery of the small intestine the superior mesenteric artery courses toward the terminal end of the ileum.
As you dissect the branches of the superior mesenteric artery, note that there is a great deal of variation from individual to individual in the pattern of arterial branching. Therefore, not every cadaver will have the "typical" branching pattern described below and in other sections of this lab manual describing blood supply. Note that arteries are named by their region of distribution, not by their origin or branching pattern. If your cadaver has an unusual pattern, be sure to look at neighboring cadavers until get a feel for the typical pattern and can recognize the branches.
Dissection Instructions: Superior Mesenteric Artery
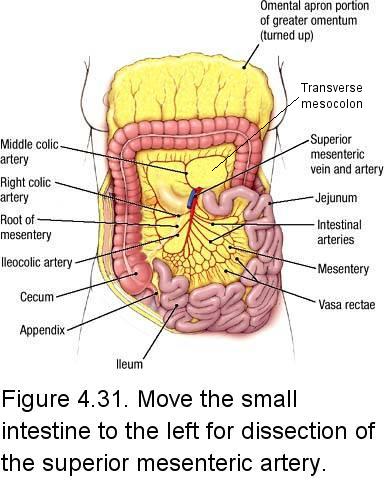
- Turn the
transverse colon and greater omentum superiorly over the costal margin. The posterior surface of the transverse mesocolon should face anteriorly (Figure 4.31). - Move the coils of the jejunum and ileum to the left side of the abdomen so that the right side of the mesentery of the small intestine faces anteriorly (Figure 4.31). Observe that the root of the mesentery is attached to the posterior abdominal wall along a line from the left upper quadrant to the right lower quadrant.
- Note that the mesentery of the small intestine contains branches of the superior mesenteric artery and superior mesenteric vein, autonomic nerves, lymphatics, and adipose tissue, sandwiched between two very thin layers of peritoneum. Remove the peritoneum on the right side of the mesentery to expose the branches of the superior mesenteric artery. To do this, use a probe to gently scrape the peritoneum so that only the right layer is torn (take care to leave the left layer of peritoneum intact; if you have created a hole in the mesentery then you have removed both the right and left layers of the peritoneum). Then grasp the torn peritoneum between your thumb and index finger. Peel it slowly, using the handle of a forceps to scrape the peritoneum free from deeper structures.
- Remove the parietal peritoneum from the posterior abdominal wall to the right of the mesentery of the small intestine. Remove the peritoneum as far laterally as the ascending colon.
- Identify the superior mesenteric artery. Use blunt dissection to trace the superior mesenteric artery proximally. Observe that it crosses anterior to the third part of the duodenum. Note that the third part of the duodenum and the left renal vein can become compressed between the superior mesenteric vessels and the abdominal aorta (see Figure).
- Use blunt dissection to clean the branches of the superior mesenteric artery. As you
dissect, note the dense autonomic nerve network surrounding the vessels. This is the
superior mesenteric plexus of nerves. Remove the nerves as necessary to clear the
dissection field. The mesentery of the small intestine also contains up to 200
mesenteric lymph nodes. Identify one or two of these lymph nodes along the branches of
the superior mesenteric vessels. The superior mesenteric lymph nodes are located near
the origin of the superior mesenteric artery from the abdominal aorta. Lymph nodes may
also be removed to clear the dissection field.
- Identify the branches of the superior mesenteric artery (Figure 4.31). Note that arteries are named by their region of distribution, not by their origin or branching pattern:
- Inferior pancreaticoduodenal artery is the first branch of the superior mesenteric artery. The inferior pancreaticoduodenal artery will not be dissected but be aware that it anastomoses with the superior pancreaticoduodenal artery, which is ultimately derived from the celiac trunk, the primary artery that supplies the abdominal foregut (abdominal esophagus, stomach, liver, gallbladder, and part of the duodenum). The duodenum and pancreas lie in the watershed between the celiac and superior mesenteric territories of blood supply and, consequently, are supplied by both arteries. The anastomoses between the superior and inferior pancreaticoduodenal arteries provide a potential site of collateral blood flow between the celiac trunk and superior mesenteric artery.
- Intestinal arteries - 15 to 18 arteries to the jejunum and the ileum. Dissect arterial branches only in the proximal jejunum and ileum. Intestinal arteries end in straight terminal branches called vasa rectae (Figure 4.32). Arcades connect the intestinal arteries. Observe the blood supply to the proximal jejunum and note that only one or two arcades are found between adjacent intestinal arteries, resulting in relatively long vasa rectae (Figure 4.32A). Examine the distal ileum and note that four or five arcades occur between adjacent intestinal arteries, resulting in relatively short vasa rectae (Figure 4.32B).
- Ileocolic artery supplies the cecum. The ileocolic artery gives rise to the appendicular artery (Figure 4.33). The ileocolic artery anastomoses with intestinal branches and with the right colic artery.
- Right colic artery supplies the ascending colon (Figure 4.31). The right colic artery arises from the right side of the superior mesenteric artery and passes to the right in a retroperitoneal position. It divides into a superior branch and an inferior branch.
- Middle colic artery supplies the transverse colon (Figure 4.31). The middle colic artery arises from the anterior surface of the superior mesenteric artery and courses through the transverse mesocolon. It divides into a right branch and a left branch.
- The border of the jejunum and ileum along which the mesentery attaches is referred to as the mesenteric border. The border opposite to where the mesentery attaches is referred to as the anti-mesenteric border. This distinction is clinically important in that surgeons must take greater care with the mesenteric border as this is where the vasa rectae are located.
- Identify the superior mesenteric vein. The superior mesenteric vein courses along the right side of the superior mesenteric artery. The superior mesenteric vein is formed by branches that correspond in name and position to the branches of the superior mesenteric artery. Posterior to the pancreas, the superior mesenteric vein joins the splenic vein to form the hepatic portal vein.
Dissection Instructions: Suspensory Ligament of the Duodenum
- Move the small intestine to the left side of the abdominal cavity and follow the jejunum proximally (Figure 4.34).
- Find the suspensory ligament of the duodenum (Ligament of Treitz), which is a fibromuscular ligament that arises from the right crus of the diaphragm and anchors the intestine at the duodenojejunal junction (Figure 4.34, inset).
- Using blunt dissection, remove the peritoneum and adipose tissue from the suspensory ligament of the duodenum.
Dissection Overview: Inferior Mesenteric Artery
The inferior mesenteric artery arises from the anterior surface of the abdominal aorta at the level of the intervertebral disc between vertebrae L2 and L3. Except for the branches that pass through the transverse mesocolon to anastomose with the middle colic artery, and those that pass through the sigmoid mesocolon to supply the sigmoid colon, the inferior mesenteric artery and its branches lie retroperitoneally.
Dissection Instructions: Inferior Mesenteric Artery
- Turn the transverse colon and greater omentum superiorly over the costal margin to expose the posterior surface of the transverse mesocolon.
- Move the small intestine to the right so that the descending colon is visible from the left colic flexure to the sigmoid colon (Figure 4.35).
- The origin of the inferior mesenteric artery lies posterior to the third part
of the duodenum, usually about one inch above bifurcation of aorta. If you have
trouble finding it, find one of its branches in the sigmoid mesocolon and trace the branch back to the main vessel. Then proceed with the dissection of the peripheral branches.
- Dissection note: The left ureter could be mistaken for the inferior mesenteric artery or one of its branches. The inferior mesenteric artery and vein and the ureter all lie in the retroperitoneal space, but the vessels pass anterior to the ureter.
- Use a probe to clean the branches of the inferior mesenteric artery (Figure 4.35).
- Left colic artery supplies the descending colon and the left third of the transverse colon. The left colic artery anastomoses with the middle colic artery (a branch of the superior mesenteric artery that supplies the transverse colon), thus contributing to the marginal artery of the colon (marginal artery of Drummond). The marginal artery of the colon is an artery that follows inner border of the ascending, transverse and descending colons, providing a collateral circulatory circuit through anastomoses between the ileocolic, right colic, middle colic, left colic and sigmoid arteries.
- Sigmoid arteries - three or four arteries that supply the sigmoid colon. Sigmoid arteries pass through the sigmoid mesocolon. Note that they form arcades similar to those of the intestinal arteries.
- Superior rectal artery supplies the proximal part of the rectum. The superior rectal artery divides into a right branch and a left branch. The right and left branches of the superior rectal artery descend into the pelvis on either side of the rectum. Do not follow them into the pelvis.
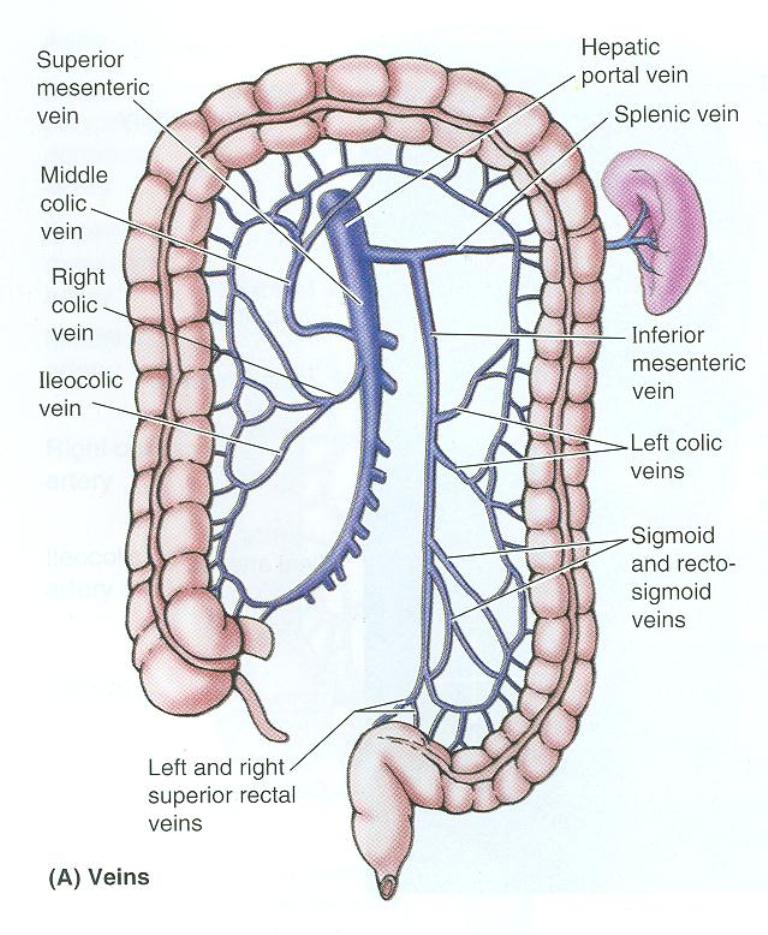
- Observe the tributaries of the inferior mesenteric vein. The tributaries of the inferior mesenteric vein correspond to the branches of the inferior mesenteric artery. The inferior mesenteric vein ascends on the left side of the inferior mesenteric artery, passes posterior to the pancreas, and joins either the splenic vein or (less frequently) the superior mesenteric vein.
- The inferior mesenteric artery and vein are accompanied by lymph vessels that drain into the inferior mesenteric nodes around the origin of the inferior mesenteric artery.
Dissection Review
- Replace the small intestine in its correct anatomical position.
- Close and open the flaps of the abdominal wall and review the location of the jejunum and ileum relative to the abdominal quadrant system.
- Review the relationships of the jejunum and ileum to surrounding structures.
- Use an illustration and the dissected specimen to review the branches of the superior mesenteric artery.
- Use an embryology textbook to review the derivatives of the embryonic midgut.
- Close and open the flaps of the abdominal wall to review the location of each part of the large intestine relative to the abdominal quadrant system.
- Review the relationship of each part of the large intestine to surrounding structures.
- Use an illustration and the dissected specimen to trace the branches of the inferior mesenteric artery.
- Use an embryology textbook to review the derivatives of the embryonic hindgut.
LEARNING OBJECTIVES - After completion of this session, the student will be able to:
- Identify the parts of the stomach.
- Identify the branches of the celiac trunk and their paths to their targets.
- Describe the relationship between the celiac trunk and neighboring structures.
- Describe the blood supply of the abdominal foregut via branches of the celiac trunk, and the basic pattern of lymphatic drainage in this region.
- Trace the potential collateral blood flow between the celiac trunk and superior mesenteric arterial territories.
- Trace the pathway of common entry of the bile duct and main pancreatic duct into the 2nd part of the duodenum.
- Identify parts of the liver and describe the relationships of its portal venous, hepatic arterial, and hepatic venous circulation.
- Identify the structures passing into and out of the porta hepatis and some of the most common variations on this pattern.
Exploration of the Peritoneum
In order to get started on the dissection of the foregut, you must first orient yourself to the peritoneal cavity, specifically the course of the peritoneum. Go through the procedure below, however any dissection required to do this should already be done.
- Observe the greater omentum (Figure 4.17). Spread this apron-like structure to appreciate its size. The greater omentum normally lies between the intestines and the anterior abdominal wall (Figure 4.20).
- Elevate the inferior border of the liver and identify the lesser omentum
(Figure 4.20 for sagittal; Figure 2.20 for anterior view). The lesser omentum passes from
the lesser curvature of the stomach and first part of the duodenum (Figure 4.22) to the inferior surface of the liver. The lesser omentum has two parts (Figure 2.20):
- Hepatogastric ligament extends from the liver to the lesser curvature of the stomach.
- Hepatoduodenal ligament extends from the liver to the first part of the duodenum
- Identify the mesentery of the small intestine (Figure 4.20). The mesentery of the small intestine suspends the jejunum and ileum from the posterior abdominal wall. Verify that the root of the mesentery crosses the posterior abdominal wall from the duodenojejunal junction in the left upper quadrant to the ileocecal junction in the right lower quadrant (Figure 4.34). The root of the mesentery is about 15 cm long. The intestinal attachment of the mesentery of the small intestine is nearly 6 m long.
- Note that these peritoneal structures are all related to a subdivision of the peritoneal cavity called the greater peritoneal sac (Figure 4.20). Posterior to the stomach and lesser omentum is a smaller subdivision of the peritoneal cavity called the lesser peritoneal sac (omental bursa) (Figure 4.20 and Figure 4.21).
- The omental foramen (epiploic foramen, foramen of Winslow) is the opening between the greater and lesser peritoneal sacs. The omental foramen lies posterior to the hepatoduodenal ligament (Figure 4.21).
- Carefully insert your finger into the omental foramen (the structures in the hepatoduodenal ligament, directly anterior to the omental foramen, are easily damaged).
- Study a diagram of the lesser peritoneal sac (Figure 4.20). The lowest part of the lesser peritoneal sac is called the inferior recess and it extends inferiorly as far as the greater omentum. During development, the inferior recess extended between the layers of the greater omentum (review an embryology text). The highest part of the lesser peritoneal sac is the superior recess. The diaphragm lies posterior to the superior recess and the caudate lobe of the liver is anterior to the superior recess.
- Posterior to the main part of the lesser peritoneal sac is the pancreas (Figure 4.20). The peritoneum that covers the pancreas forms part of the posterior wall of the lesser peritoneal sac.
Dissection Overview
As described previously, the celiac trunk is the artery that supplies the abdominal foregut, which consists of most of the abdominal esophagus, stomach, liver, gallbladder, and part of the duodenum. The celiac trunk also supplies the spleen and pancreas.
The order of dissection will be as follows: The ribs and diaphragm will be cut to allow the liver to be retracted superiorly, exposing the lesser omentum. The surface features of the stomach will be studied. The vessels and ducts in the hepatoduodenal ligament will be demonstrated. The branches of the celiac trunk that supply the stomach, spleen, liver, and gallbladder will be dissected. The remainder of the field of supply of the celiac trunk (to the duodenum and pancreas) will be dissected later. The spleen, liver, and gallbladder will be studied.
Dissection Instructions
- Place the greater omentum in its correct anatomical position (Figure 4.17).
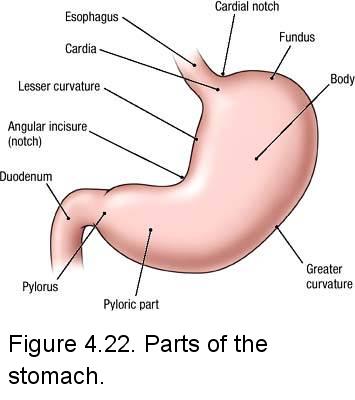
- Identify the parts of the stomach (Figure 4.22):
- Anterior surface
- Greater curvature
- Lesser curvature
- Cardia
- Cardial notch
- Fundus
- Body
- Angular incisure (notch) - separates the body and pyloric part of the stomach
- Pyloric part (consists of the pyloric antrum and pyloric canal)
- Pylorus (consists of the pyloric sphincter and pyloric orifice)
- Identify the following features of the liver (Figure 4.23A,B):
- Right anatomical lobe
- Left anatomical lobe
- Diaphragmatic surface
- Inferior border
- Use your hand to raise the inferior border of the liver. Identify the visceral surface of the liver (Figure 4.23). The visceral surface is in contact with the gallbladder and the peritoneum covering the stomach, duodenum, colon, right kidney, and right suprarenal gland.
- Identify the porta hepatis on the visceral surface of the liver. It is the fissure through which vessels, ducts, lymphatics, and nerves enter the liver (Figure 2.64 for inferior view; Figure 4.23B)
Dissection Instructions: Celiac Trunk
As you dissect the branches of the celiac trunk, realize that arteries are named by their region of distribution, not by their origin or branching pattern.
- Use bone cutters to detach the costal cartilages of ribs 6 and 7 from the xiphisternal junction and lateral border of the sternum. Working through the opening just created, use scissors to make a vertical cut through the diaphragm. Extend this cut to the coronary ligament on the superior surface of the liver. Retract the ribs, diaphragm, and liver superiorly to expose the lesser omentum. If the thorax has been previously dissected, it is sometimes helpful to place one hand in the right costodiaphragmatic recess to elevate the costal margin and use scissors to detach the diaphragm from its costal attachments.
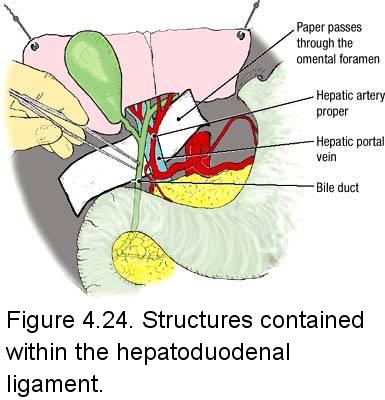
- Insert the index finger of your left hand into the omental foramen (Figure 4.21). Anterior to your finger is the hepatoduodenal ligament and its contents: the biliary tree, hepatic artery proper, hepatic portal vein, autonomic nerves, and lymphatics.
- To aid dissection, place a strip of white paper into the omental foramen (Figure 4.24).
- Use blunt dissection to remove the peritoneum from the anterior surface of the hepatoduodenal ligament (anterior to the vessels and ducts).
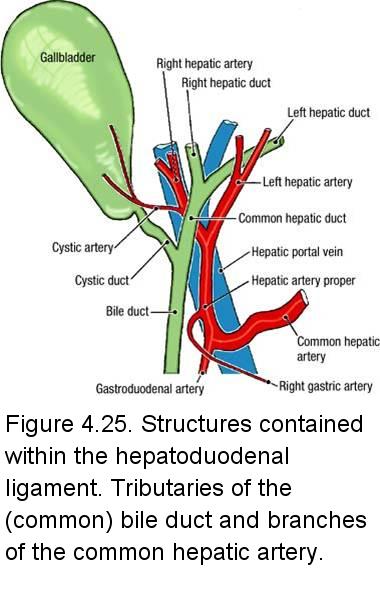
- Identify the three large structures that are contained within the hepatoduodenal ligament: bile duct (common bile duct), hepatic artery proper, and hepatic portal vein (Figure 4.24). The bile duct is the most lateral of the three.
- Use a probe to trace the bile duct superiorly. Identify the cystic duct and the common hepatic duct (Figure 4.25). The biliary tree consists of these three ducts: the common hepatic duct joins the cystic duct to form the bile duct.
- Follow the common hepatic duct superiorly until it receives its tributaries, the right hepatic duct and the
left hepatic duct. The right and left hepatic ducts exit the porta hepatis. The right and left hepatic ducts may be difficult to dissect because they are often either buried within the liver or your view of them is obstructed by the liver.
- Clean the hepatic artery proper. The tough "connective tissue" around these vessels contains an autonomic nerve plexus. To clear the dissection field, remove the autonomic nerves.
- Follow the hepatic artery proper toward the liver through the hepatoduodenal ligament. At the porta hepatis the hepatic artery proper branches into the left hepatic artery and the right hepatic artery (Figure 4.25). Note that occasionally the right hepatic artery arises from the superior mesenteric artery. In these cases, the right hepatic artery passes in the posterior aspect of the hepatoduodenal ligament. When this occurs, the left hepatic artery and the hepatic artery proper are essentially the same artery (i.e., the hepatic artery proper doesn't bifurcate and supplies the left functional lobe of the liver).
- Two other arteries arise in the hepatoduodenal ligament (Figure 4.25):
- Cystic artery arises from the right hepatic artery. Follow it to the gallbladder. Note that the cystic artery occasionaly arises from the superior mesenteric artery.
- Right gastric artery arises from the hepatic artery proper. Follow it to the lesser curvature of the stomach. Note that this vessel is small, and often breaks while opening the space between the liver and the stomach. If you don't see this artery, look for a small stump or opening on the anterior surface of the hepatic artery proper.
- Lymphatics are also contained within the hepatoduodenal ligament. The lymphatic vessels are too small to dissect but hepatic lymph nodes can be seen. The lymph nodes may be removed to clear the dissection field.
- Follow the hepatic artery proper inferiorly and confirm that it is a branch of the common hepatic artery (Figure 4.25).
- Observe that the common hepatic artery gives rise to the gastroduodenal artery. The gastroduodenal artery passes posterior to the first part of the duodenum (Figure 4.26). Follow the gastroduodenal artery until it divides to give rise to the right gastro-omental (gastroepiploic) artery and the superior pancreaticoduodenal artery.
- Follow the common hepatic artery to the left toward the celiac trunk (Figure 4.26). Note that the celiac trunk arises from the anterior surface of the abdominal aorta at the level of the 12th thoracic vertebra. The celiac trunk is very short (less than 2 cm in most cases) and divides into three branches:
- Common hepatic artery (already dissected)
- Left gastric artery
- Splenic artery
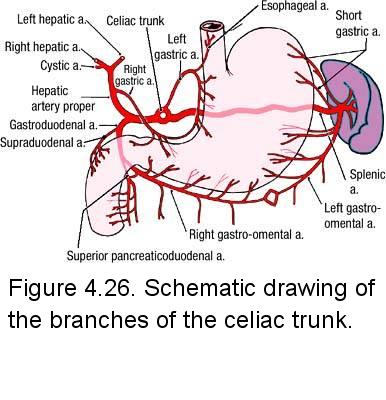
- Use blunt dissection to follow the left gastric artery toward the esophagus and stomach (Figure 4.26). The left gastric artery reaches the stomach near the esophagus and then follows the lesser curvature of the stomach within the lesser omentum. The left gastric artery forms an anastomosis with the right gastric artery along the lesser curvature of the stomach. Branches of the gastric arteries distribute to the anterior and posterior surfaces of the stomach.
- Follow the splenic artery to the left for about 5 cm and verify that it lies against the posterior abdominal wall. The splenic artery courses along the superior border of the pancreas and may be partially imbedded in it. Do not dissect the splenic artery from the pancreas at this time. Note that short gastric arteries arise from the splenic artery to supply the fundus of the stomach (Figure 4.26).
- Find the left gastro-omental (gastroepiploic) artery in the greater omentum about 2 cm from the greater curvature of the stomach (Figure 4.26). The left gastro-omental artery is a branch of the splenic artery. Follow the left gastro-omental artery as far as you can toward its origin off the splenic artery near the hilum of the spleen.
- Find the right gastro-omental artery in the greater omentum near the right end of the greater curvature of the stomach. The right gastro-omental artery anastomoses with the left gastro-omental artery. Follow the right gastro-omental artery to the right to find its origin from the gastroduodenal branch of the common hepatic artery.
- Return to the hepatoduodenal ligament and identify the hepatic portal vein. The hepatic portal vein lies posterior to both the hepatic artery proper and the bile duct (Figure 4.24). Follow the hepatic portal vein superiorly and observe that it passes into the porta hepatis, where it divides into right and left portal veins (you do not need to dissect or identify the right and left portal veins). The hepatic portal vein usually receives the left and right gastric veins as tributaries. Inferiorly, the hepatic portal vein passes posterior to the first part of the duodenum.
Dissection Instructions: Spleen
The spleen is the largest hematopoietic organ in the body. Its size and weight may vary considerably depending upon the
blood volume that it contains. The spleen is covered by visceral peritoneum except at the hilum where the splenic vessels enter and leave.
- Use your left hand to retract the fundus of the stomach to the right. Use your right hand to gently pull the spleen anteriorly (Figure 4.28).
- Observe that the spleen has a smooth diaphragmatic surface. The spleen has sharp anterior, inferior, and superior borders. The superior border of the spleen is often notched.
- The visceral surface of the spleen is related to four organs:
- Stomach
- Left kidney
- Transverse colon (left colic flexure)
- Pancreas
- The diaphragmatic surface of the spleen is related (through the diaphragm) to ribs 9, 10, and 11 (Figure 4.28).
IN THE CLINIC: Spleen
The relationship of the spleen to ribs 9, 10, and 11 is of clinical importance in evaluating rib fractures and penetrating wounds. A lacerated spleen bleeds profusely into the abdominal cavity and may have to be removed surgically (splenectomy). It must be emphasized that there is a risk of puncturing the spleen during pleural tap (thoracocentesis).
An enlarged spleen (splenomegaly) may be encountered during physical examination. The spleen is considered enlarged when it can be palpated inferior to the costal margin.
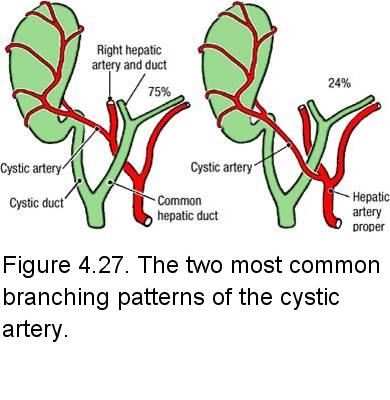
In about 12% of cases the right hepatic artery arises from the superior mesenteric artery. An aberrant left hepatic artery may arise from the left gastric artery. During surgical removal of the stomach (gastrectomy), blood flow to an aberrant left hepatic artery could be interrupted, endangering the left lobe of the liver.
The cystic artery usually arises from the right hepatic artery, but other origins are possible. The cystic artery may pass posterior (75%) or anterior (24%) to the common hepatic duct (Figure 4.27).
Dissection Review
- Use an illustration and the dissected specimen to trace the branches of the celiac trunk.
- Review the relationships of the structures in the hepatoduodenal ligament.
- Review the boundaries of the omental foramen.
- Use an embryology textbook to review the development of the liver and the ventral mesogastrium.
- Review the derivatives of the embryonic foregut.
LEARNING OBJECTIVES - After completion of this session, the student will be able to:
- Identify the parts of the spleen and its relationships to neighboring structures.
- Identify parts of the liver and describe the relationships of its portal venous, hepatic arterial, and hepatic venous circulation.
- Identify the structures passing into and out of the porta hepatis and some of the most common variations on this pattern.
- Identify the parts of the gallbladder and its relationships to neighboring structures.
- Describe the veins that form the hepatic portal vein.
- Describe all components of the portal system of veins.
- Describe portal hypertension and its clinical implications.
- Identify the parts of the duodenum and its relationships to neighboring structures.
- Identify the parts of the pancreas and its relationships to neighboring structures.
- Identify and describe the parts and peritoneal relationships of the duodenum and pancreas.
Dissection Instructions: Liver
- Review the falciform ligament and the coronary ligament of the liver (Figure 2.64).
- Use scissors to cut the falciform ligament along its attachment to the anterior abdominal wall, if you haven't done this already. Extend the cut superiorly and cut the right and left triangular ligaments along the inferior surface of the diaphragm.
- Insert your fingers between the liver and the diaphragm and tear the connective tissue that attaches the liver to the diaphragm. Cut the posterior layer of the coronary ligament.
- Extend the cut previously made in the diaphragm toward the inferior vena cava. Use scissors to cut the inferior vena cava between the liver and the diaphragm. Elevate the inferior border of the liver and cut the inferior vena cava again, as close to the inferior surface of the liver as possible. These two cuts will leave a short segment of the inferior vena cava within the liver (Figure 4.29B).
- The liver should now be freely mobile but attached to the other abdominal viscera by the biliary tree, hepatic artery proper, and hepatic portal vein. Move the liver carefully to avoid tearing these structures.
- Examine the liver and note that the right lobe is six times larger than the left lobe. The sharp inferior border of the liver separates the visceral surface from the diaphragmatic surface.
- Identify the bare area on the posterior aspect of the diaphragmatic surface. Here, the liver was adjacent to the diaphragm and not covered by peritoneum. Around the bare area, note the cut edges of the coronary ligament.
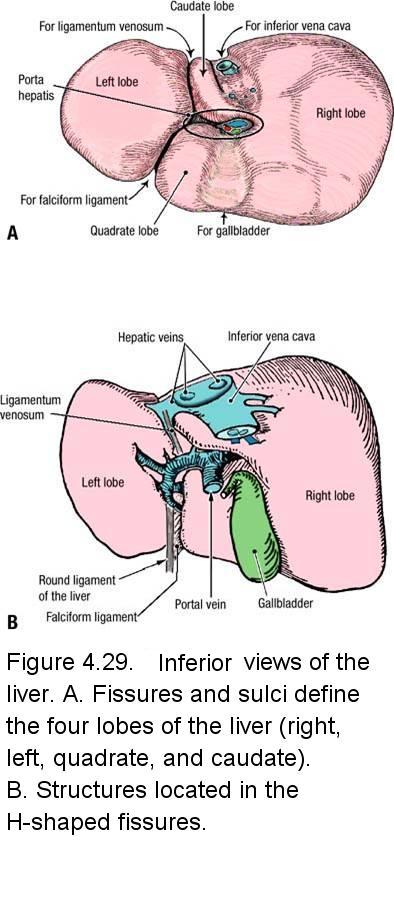
- Examine the visceral surface of the liver (Figure 4.29A). An H-shaped set of fissures and fossae defines four lobes. Identify the right lobe, left lobe, caudate lobe, and quadrate lobe.
- Observe that the ligamentum venosum and falciform ligament occupy the left fissure of the "H" (Figure 4.29B; Figure 2.64). The gallbladder and inferior vena cava occupy the fossae that form the right side of the "H."
- Identify the porta hepatis. It forms the horizontal bar of the "H." The structures passing through the hepatoduodenal ligament (biliary tree, hepatic arteries, hepatic portal vein, lymphatics, and autonomic nerves) enter or leave the liver at the porta hepatis.
- Examine the small segment of the inferior vena cava that is attached to the liver. Note that several hepatic veins drain directly into the inferior vena cava (Figure 4.29B).
- Use a textbook to study the two conventions by which the liver may be divided into lobes (Figure 2.64). The falciform ligament divides the liver into right and left anatomical lobes. The pattern of its bile drainage and vascular supply are used to divide the liver into right and left functional lobes.
- The liver has a substantial lymphatic drainage. At the porta hepatis, small lymph vessels drain into hepatic lymph nodes. From the hepatic lymph nodes, lymphatic vessels follow the hepatic arteries to celiac lymph nodes located around the celiac trunk.
IN THE CLINIC: Liver
The liver may undergo pathologic changes that could be encountered during dissection. The liver may be enlarged. This happens in liver congestion due to cardiac insufficiency (cardiac liver). In contrast, the liver may be small and have fibrous nodules. Such a finding may indicate cirrhosis of the liver. Because the liver is essentially a capillary bed downstream from the gastrointestinal tract, metastatic tumor cells are often trapped within it, resulting in secondary tumors.
The liver may undergo pathologic changes that could be encountered during dissection. The liver may be enlarged. This happens in liver congestion due to cardiac insufficiency (cardiac liver). In contrast, the liver may be small and have fibrous nodules. Such a finding may indicate cirrhosis of the liver. Because the liver is essentially a capillary bed downstream from the gastrointestinal tract, metastatic tumor cells are often trapped within it, resulting in secondary tumors.
Dissection Instructions: Gallbladder
- Replace the liver into its correct anatomical position.
- Confirm that the gallbladder is located near the tip of the ninth costal cartilage in the midclavicular line (Figure 4.17).
- Reposition the liver to expose the visceral surface. Use blunt dissection to remove the gallbladder from its fossa.
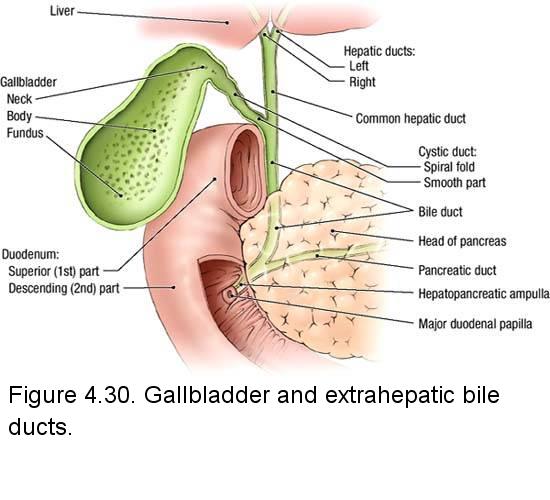
- Identify the parts of the gallbladder (Figure 4.30):
- Neck
- Body
- Fundus
- Review the course of the cystic artery. The cystic artery may be stained green by bile and is often fragile and difficult to dissect.
- Use scissors to make a longitudinal incision through the wall of the gallbladder, beginning at the fundus and continuing through the neck. If gallstones are present, remove them. The spiral fold is a fold in the mucosal lining of the neck that continues into the cystic duct.
IN THE CLINIC: Triangle of Calot
An important anatomical landmark used by surgeons performing cholecystectomies (removal of the gallbladder) is the Triangle of Calot (cystohepatic triangle). The triangle was first described by Jean Francois Calot in 1891 as bounded by the cystic duct, common hepatic duct, and the cystic artery. Over the years many surgeons have expanded the triangle such that its borders are the cystic duct, common hepatic duct, and the inferior border of the liver. The precise definition is now controversial (e.g., our surgery clerkship faculty are divided in their opinion). Nevertheless, the Triangle of Calot is an important hepatobiliary surgical landmark.
An important anatomical landmark used by surgeons performing cholecystectomies (removal of the gallbladder) is the Triangle of Calot (cystohepatic triangle). The triangle was first described by Jean Francois Calot in 1891 as bounded by the cystic duct, common hepatic duct, and the cystic artery. Over the years many surgeons have expanded the triangle such that its borders are the cystic duct, common hepatic duct, and the inferior border of the liver. The precise definition is now controversial (e.g., our surgery clerkship faculty are divided in their opinion). Nevertheless, the Triangle of Calot is an important hepatobiliary surgical landmark.
Dissection Overview: Duodenum
The duodenum is the part of the small intestine between the stomach and the jejunum. The duodenum is the drainage point for the ducts of the liver and pancreas. The pancreas lies within the bend of the duodenum. The pancreas is both an endocrine and an exocrine organ and has a rich blood supply arising from the celiac trunk and the superior mesenteric artery.
Dissection Instructions: Duodenum
- Turn the transverse colon and greater omentum superiorly over the costal margin (Figure 4.35).
- Use blunt dissection to remove the remaining connective tissue and peritoneum from the anterior surface of the duodenum and pancreas.
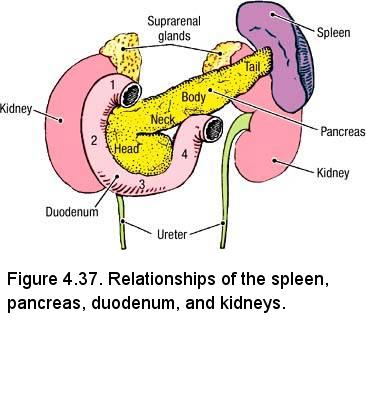
- Observe the four parts of the duodenum (Figure 4.37):
- Superior (first) part - at the level of vertebra L1. The superior part of the duodenum lies in the transverse plane and the hepatoduodenal ligament is attached to it. It is mostly intraperitoneal.
- Descending (second) part - at the level of vertebra L2. The descending part of the duodenum is positioned to the right of the midline and anterior to the right kidney, right renal vessels, and inferior vena cava. It is retroperitoneal. The bile duct and the main pancreatic duct drain into the descending part of the duodenum.
- Horizontal (third) part - at the level of vertebra L3. The horizontal part of the duodenum lies anterior to the inferior vena cava and the abdominal aorta. It is retroperitoneal. The horizontal part of the duodenum is crossed anteriorly by the superior mesenteric vessels and posteriorly by the inferior mesenteric vessels.
- Ascending (fourth) part - ascends to the level of vertebra L2. The ascending part of the duodenum is retroperitoneal throughout most of its length. The ascending part of the duodenum turns anteriorly to join the jejunum at the duodenojejunal junction.
Dissection Overview: Pancreas
Identify the pancreas within the bend of the duodenum. Note that it is a secondarily retroperitoneal organ that lies across the midline and that it is positioned against vertebral bodies L1 to L3. Identify the parts of the pancreas (Figure 4.37):
- Head - lies within the curve of the duodenum. The uncinate process is a small projection (to be identifed later) from the inferior margin of the head that passes posterior to the superior mesenteric vessels. The inferior vena cava lies posterior to the head of the pancreas.
- Neck - a short portion that lies anterior to the superior mesenteric vessels and connects the head of the pancreas to the body.
- Body - extends from right to left and slightly superiorly as it crosses the posterior abdominal wall. The abdominal aorta lies posterior to the body of the pancreas.
- Tail - the narrow left end of the gland. The tip of the tail lies in the splenorenal ligament and contacts the hilum of the spleen.
Dissection Instructions: Hepatic Portal Vein
- The splenic vein courses posterior to the pancreas, inferior to the splenic artery. Use a probe to dissect posterior to the body of the pancreas and find the splenic vein.
- Follow the splenic vein to the right, where it is joined by the superior mesenteric vein. This is the origin of the hepatic portal vein. Recall that the hepatic portal vein ascends in the hepatoduodenal ligament to the porta hepatis.
- Return to the field of distribution of the inferior mesenteric vein. Find it and follow it superiorly. The inferior mesenteric vein usually joins the splenic vein, but it may join the superior mesenteric vein or the junction of the superior mesenteric and splenic veins.
- Use a textbook or atlas to review the portal-systemic (portal-caval) anastomoses:
- Gastroesophageal - left gastric vein/esophageal veins/azygos vein
- Anorectal - superior rectal vein/middle and inferior rectal veins
- Paraumbilical - paraumbilical veins/superficial epigastric veins
- Retroperitoneal - colic veins/retroperitoneal veins
IN THE CLINIC: Portal Hypertension
The hepatic portal system of veins has no valves. When the hepatic portal vein becomes blocked, blood pressure increases in the hepatic portal system (portal hypertension) and its tributaries become engorged. Portal hypertension causes hemorrhoids and varicose gastric and esophageal veins. Bleeding from ruptured gastroesophageal varices is a dangerous complication of portal hypertension.
The hepatic portal system of veins has no valves. When the hepatic portal vein becomes blocked, blood pressure increases in the hepatic portal system (portal hypertension) and its tributaries become engorged. Portal hypertension causes hemorrhoids and varicose gastric and esophageal veins. Bleeding from ruptured gastroesophageal varices is a dangerous complication of portal hypertension.
Dissection Review
- Replace the organs in their correct anatomical positions.
- Close and open the flaps of the abdominal wall and review the location of each organ relative to the abdominal quadrant system.
- Review the parts of the organs dissected and their relationships to surrounding structures.
- Use an embryology textbook to review the development of the liver and the ventral mesogastrium.
- Review the relationship of each part of the duodenum to surrounding structures.
- Use an illustration and the dissected specimen to reconstruct the blood supply to the pancreas and duodenum. 5. Use an embryology textbook to review the development of the liver, pancreas, and duodenum.
LEARNING OBJECTIVES - After completion of this session, the student will be able to:
- Describe the internal structure of the small intestine, including the duodenum, jejunum and ileum. Be able to distinguish between jejunum and ileum based on a comparison of their internal features such as circular folds and external features such as intestinal arteries.
- Describe the internal structure of the large intestine.
- Identify the main pancreatic duct, its relationship with the biliary system and its drainage point into the GI tract.
Dissection Overview: Removal of the Gastrointestinal Tract
The order of dissection will be as follows: The rectum will be cut, using ligatures to prevent spilling its contents. The arteries to the gastrointestinal tract (celiac trunk, superior mesenteric artery, and inferior mesenteric artery) will be cut. The esophagus will be cut. The gastrointestinal tract will then be removed and reviewed outside of the body. Selected areas of the gastrointestinal tract will be opened to study their internal features.
Dissection Instructions: Removal of the Gastrointestinal Tract
- Tie two strings 4 cm apart at the junction between the sigmoid colon and the rectum. Use scissors to cut the large intestine between the strings.
- Cut the sigmoid arteries and left colic artery 1 cm distal to where they arise from the inferior mesenteric artery. Do not cut the superior rectal artery. Cut the superior rectal vein where it arises from the inferior mesenteric vein.
- Cut the parietal peritoneum lateral to the descending colon and use your fingers to free the descending colon from the posterior abdominal wall. Roll the sigmoid and descending colons toward the midline and use your fingers to loosen its blood vessels from the posterior abdominal wall.
- Use scissors to cut the parietal peritoneum lateral to the ascending colon and use your fingers to free the ascending colon from the posterior abdominal wall. Roll the ascending colon toward the midline and use your fingers to loosen its blood vessels from the posterior abdominal wall.
- Reflect the ileum, jejunum, and mesentery superiorly to expose the superior mesenteric artery where it arises from the abdominal aorta.
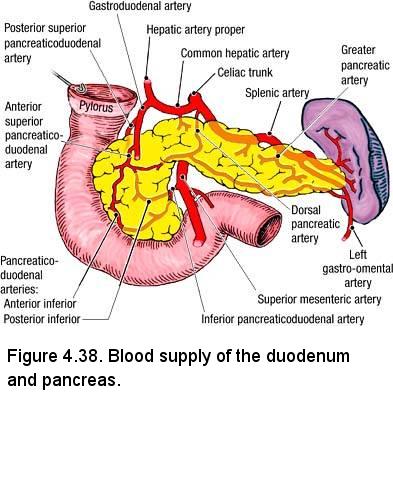
- Reflect the superior mesenteric artery superiorly at its origin from the abdominal aorta. The uncinate process of the pancreas is located posterior the superior mesenteric artery, superior to the left renal vein, and to the left of the inferior vena cava.
- Use scissors to cut the superior mesenteric artery near the aorta, leaving a 1-cm stump. The inferior pancreaticoduodenal artery is usually the most proximal branch of the superior mesenteric artery, although its origin is variable (Figure 4.38). The inferior pancreaticoduodenal artery enters the inferior portion of the head of the pancreas. Cut the superior mesenteric artery proximal to where the inferior pancreaticoduodenal artery arises from it, but don't spend a lot of time looking for it.
- Gently detach the uncinate process from the posterior abdominal wall.
- Inferior to the diaphragm, cut the esophagus. Cut the vagal nerve trunks at the same level.
- Use scissors to cut the suspensory ligament of the duodenum close to the duodenojejunal junction.
- Grasp the spleen and gently pull it medially. Insert your fingers posterior to the spleen and carefully free the splenic vessels, tail of the pancreas, and body of the pancreas from the posterior abdominal wall. Carefully reflect the spleen, stomach, greater splanchnic nerve where it passes into the celiac ganglion. Spare the greater splanchnic nerve.
- Cut any autonomic nerve fibers emerging from the celiac ganglion as they jump onto the celiac artery and its branches.
- Use scissors to cut the celiac trunk distal to the celiac ganglion, but proximal to the common hepatic, left gastric, and splenic arteries.
- Free the stomach from any peritoneal attachments it may still have to the posterior abdominal wall.
- Insert your fingers posterior to the duodenum and free it from the posterior abdominal wall.
- The gastrointestinal tract, liver, gallbladder, pancreas, and spleen should now be free of attachments. Remove them from the abdominal cavity. Be careful not to twist or tear the structures in the hepatoduodenal ligament.
- Arrange the abdominal viscera in their anatomical positions on the dissecting table or trays provided by your instructor and study the parts from the anterior view:
- Trace the branches of the celiac trunk, superior mesenteric artery, and inferior mesenteric artery to their areas of distribution.
- Observe the formation and termination of the hepatic portal vein.
- Note the differences between the branching pattern of the arteries and the veins.
- Turn the viscera and repeat the exercise from the posterior view.
- The viscera may be stored in a large plastic bag or in the abdominal cavity. Wet these specimens frequently with mold-inhibiting solution.
Dissection Overview: Internal Features of the Gastrointestinal Tract
The removed GI tract will be taken to a sink and selected areas will be opened and rinsed in order to study their internal features. The function of the small intestine is to absorb nutrients from food. It has elaborate folds of mucosa that increase surface area and a rich blood supply to transport the absorbed nutrients. Absorption of water from fecal material is a major function of the large intestine. The relatively smooth mucosal surface of the large intestine is well suited for this function, as a smooth surface is less likely to impede the movement of progressively more solid fecal matter.
Dissection Instructions: Internal Features of the Gastrointestinal Tract
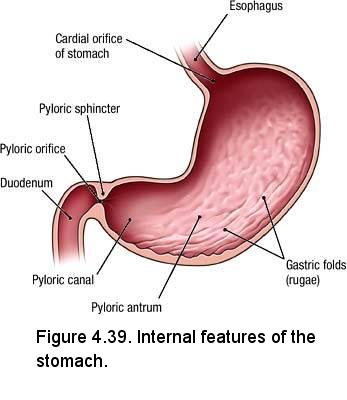
- Use scissors to open the stomach along its anterior surface. Extend the cut into the first part of the duodenum. Rinse the mucosa and observe the following features (Figure 4.39):
- Gastric folds (rugae)
- Pyloric part (consists of the pyloric antrum and pyloric canal)
- Pyloric sphincter
- Pyloric orifice
- Use scissors to make a longitudinal incision in the anterior wall of the duodenum. If necessary, you may carry the GI tract on a tray to the flush sink and rinse out the contents. In the second part of the duodenum identify the following (Figure 4.40):
- Circular folds (plicae circulares)
- Major (greater) duodenal papilla - an elevation of mucosa on the medial wall of the second part of the duodenum. The major duodenal papilla is the shared opening of the main pancreatic duct and bile duct.
- Minor (lesser) duodenal papilla - the site of drainage of the accessory pancreatic duct. If present, it will be approximately 2 cm superior to the major duodenal papilla.
- Use scissors to make a 5-cm longitudinal incision in the proximal jejunum and another in the distal ileum. Rinse the mucosa and compare features. Note that the circular folds are larger and closer together in the jejunum (Figure 4.41).
- Use scissors to make an incision approximately 7.5 cm long in the anterior wall of the cecum. Rinse the mucosa and identify the following (Figure 4.42):
- Ileocecal orifice
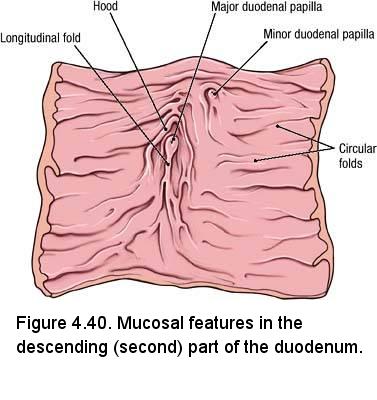
- Superior and inferior lips of the ileocecal valve
- Opening of the appendix
- Ileocecal orifice
- Make an incision approximately 5 cm long in the anterior surface of the transverse colon. Note the semilunar folds (plicae semilunares) between adjacent haustra. Observe the relative smoothness of the mucosa.
- Using the location of the greater duodenal papilla as a guide, use a probe to gently dissect into the posterior surface of the head of the pancreas and find the main pancreatic duct (Illustration; Structure 9 in dissection image). The main pancreatic duct usually appears as a flat, white structure with small tributaries on either side (it looks a little like a cartoon fish spine). Trace the main pancreatic duct through the neck and into the body. The accessory pancreatic duct joins the superior side of the main pancreatic duct.
- Follow the main pancreatic duct toward the descending part of the duodenum. Observe that the main pancreatic duct is joined by the bile duct to form the hepatopancreatic ampulla (ampula of Vater).
- Return to the celiac trunk and follow the splenic artery as it passes to the left along the superior margin of the pancreas (Figure 4.38). Up to 10 small branches of the splenic artery supply the body and tail of the pancreas. FYI, the dorsal pancreatic artery enters the neck of the pancreas and the greater pancreatic (pancreatica magna) artery enters the pancreas at the junction of the medial two-thirds and lateral one-third of the gland
- Follow the splenic artery to the hilum of the spleen and identify the left gastro-omental artery. Complete the dissection of the left gastro-omental artery by following it through the greater omentum to its anastomosis with the right gastro-omental artery.
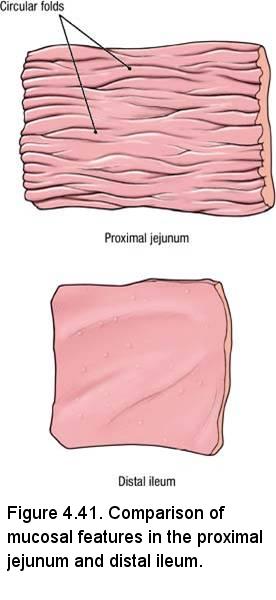
- The veins of the pancreas correspond to the arteries. They drain into the superior mesenteric and splenic veins and ultimately are tributaries to the hepatic portal vein.
- The viscera may be stored in a large plastic bag or in the abdominal cavity. Wet these specimens frequently with mold-inhibiting solution.
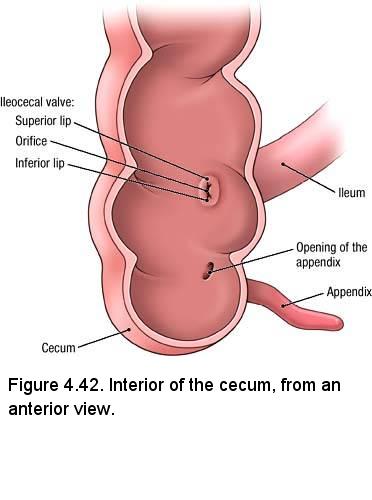
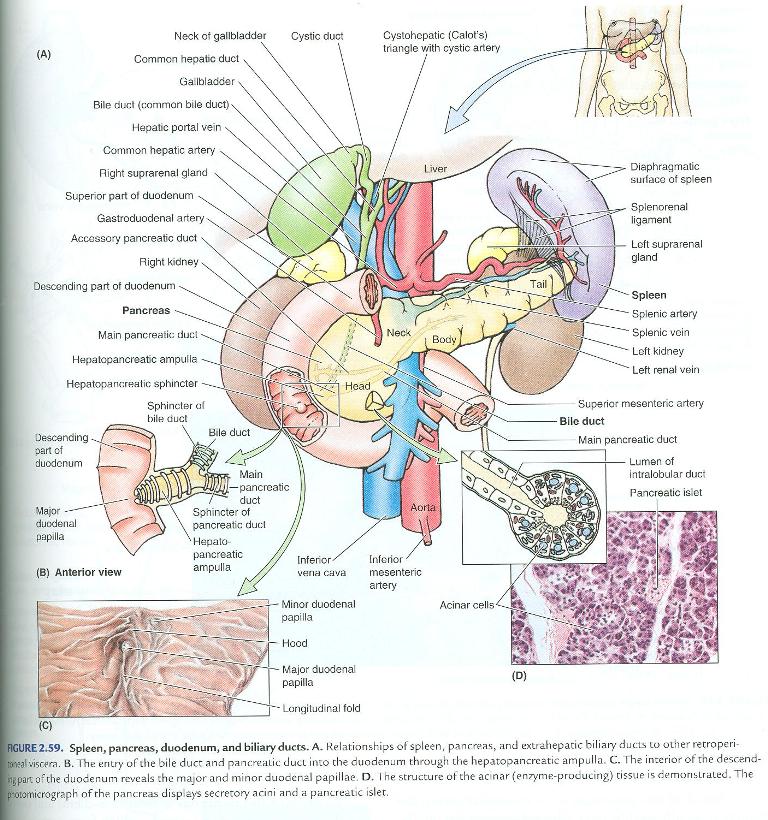
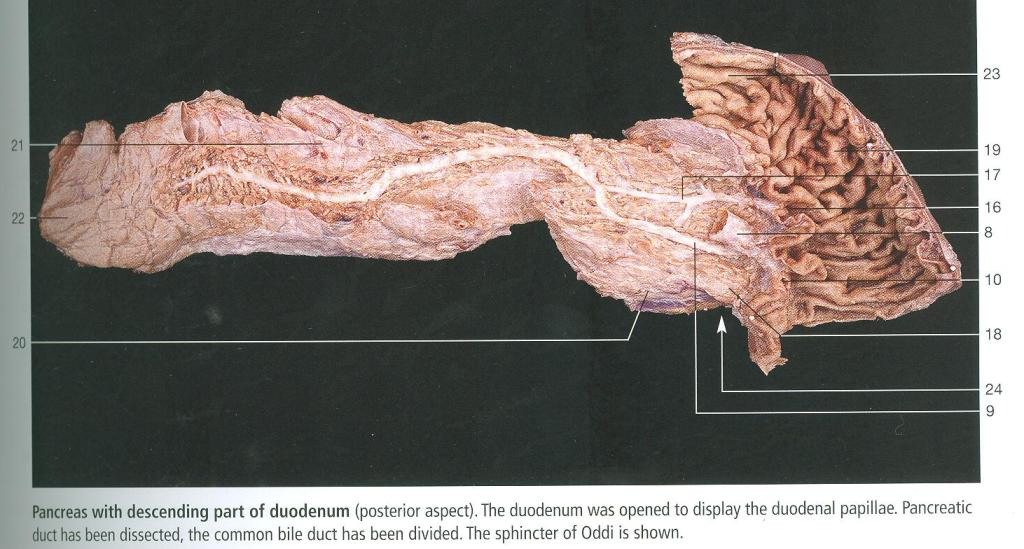
Dissection Review
- Review the features of the gastrointestinal mucosa. Compare the quantity and complexity of circular folds in the proximal and distal parts of the small intestine. Compare this arrangement to the mucosal features seen in the stomach and large intestine. Correlate your findings to the function of the organs dissected.
- Recall the locations of valves in the gastrointestinal tract.
- Review the formation and field of drainage of the hepatic portal vein.
- Trace a drop of blood from the small intestine to the inferior vena cava, naming all veins that are encountered along the way.
Prosection Overview: The Digestive System
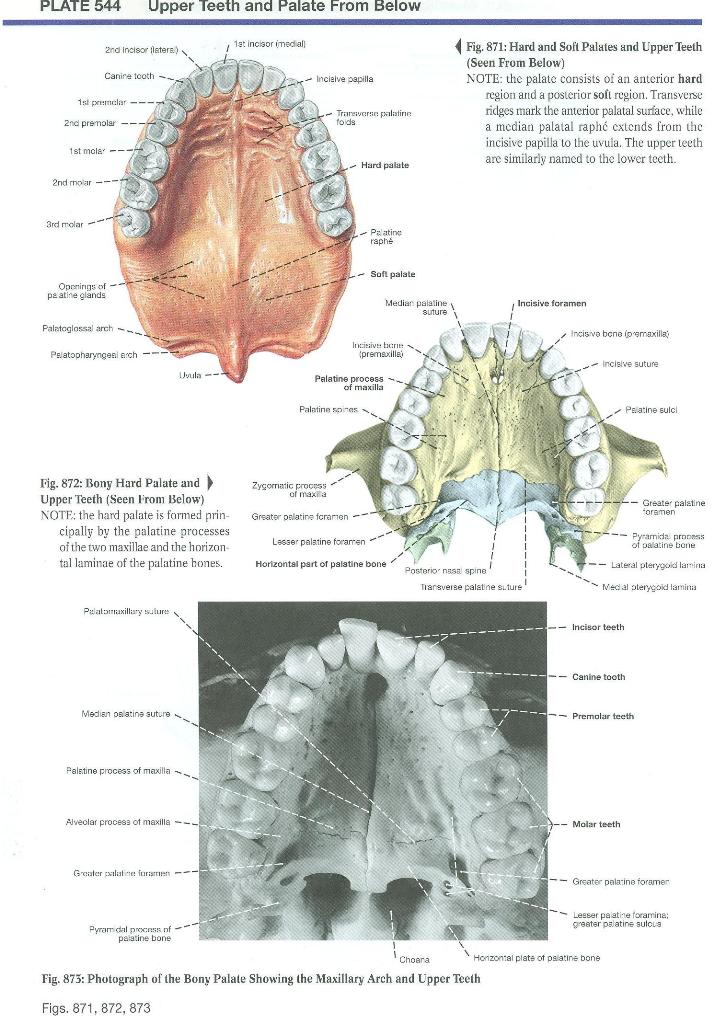
You are dissecting the digestive system from the abdominal esophagus to the anal opening. The upper part of the digestive system will be studied on a skull and some prosections.
Prosection Instructions - On the skull:
The teeth are set in bony sockets in the upper (maxilla) (Plate 544) and lower (mandible) (Plate 543) jaws. To adjust the arrangement of the teeth to the growth of the jaws we have two sets of teeth, the deciduous (primary, "baby", "milk") and permanent (secondary) teeth. Children have 20 deciduous teeth while adults have 32 permanent teeth. Deciduous teeth erupt from about 6 months to 2 years of age. The deciduous teeth are shed and replaced with permanent teeth from about age 6 to 18. Teeth are grouped as incisors for cutting, canines for piercing, premolars and molars for grinding
- Identify the maxilla and the mandible
- Identify on both the upper and lower jaws, starting from the midline (4 quadrants of 8 teeth each):
- 2 incisors
- 1 canine
- 2 premolars
- 3 molars
- Identify the hard palate (formed by the maxillae and palatine bones)
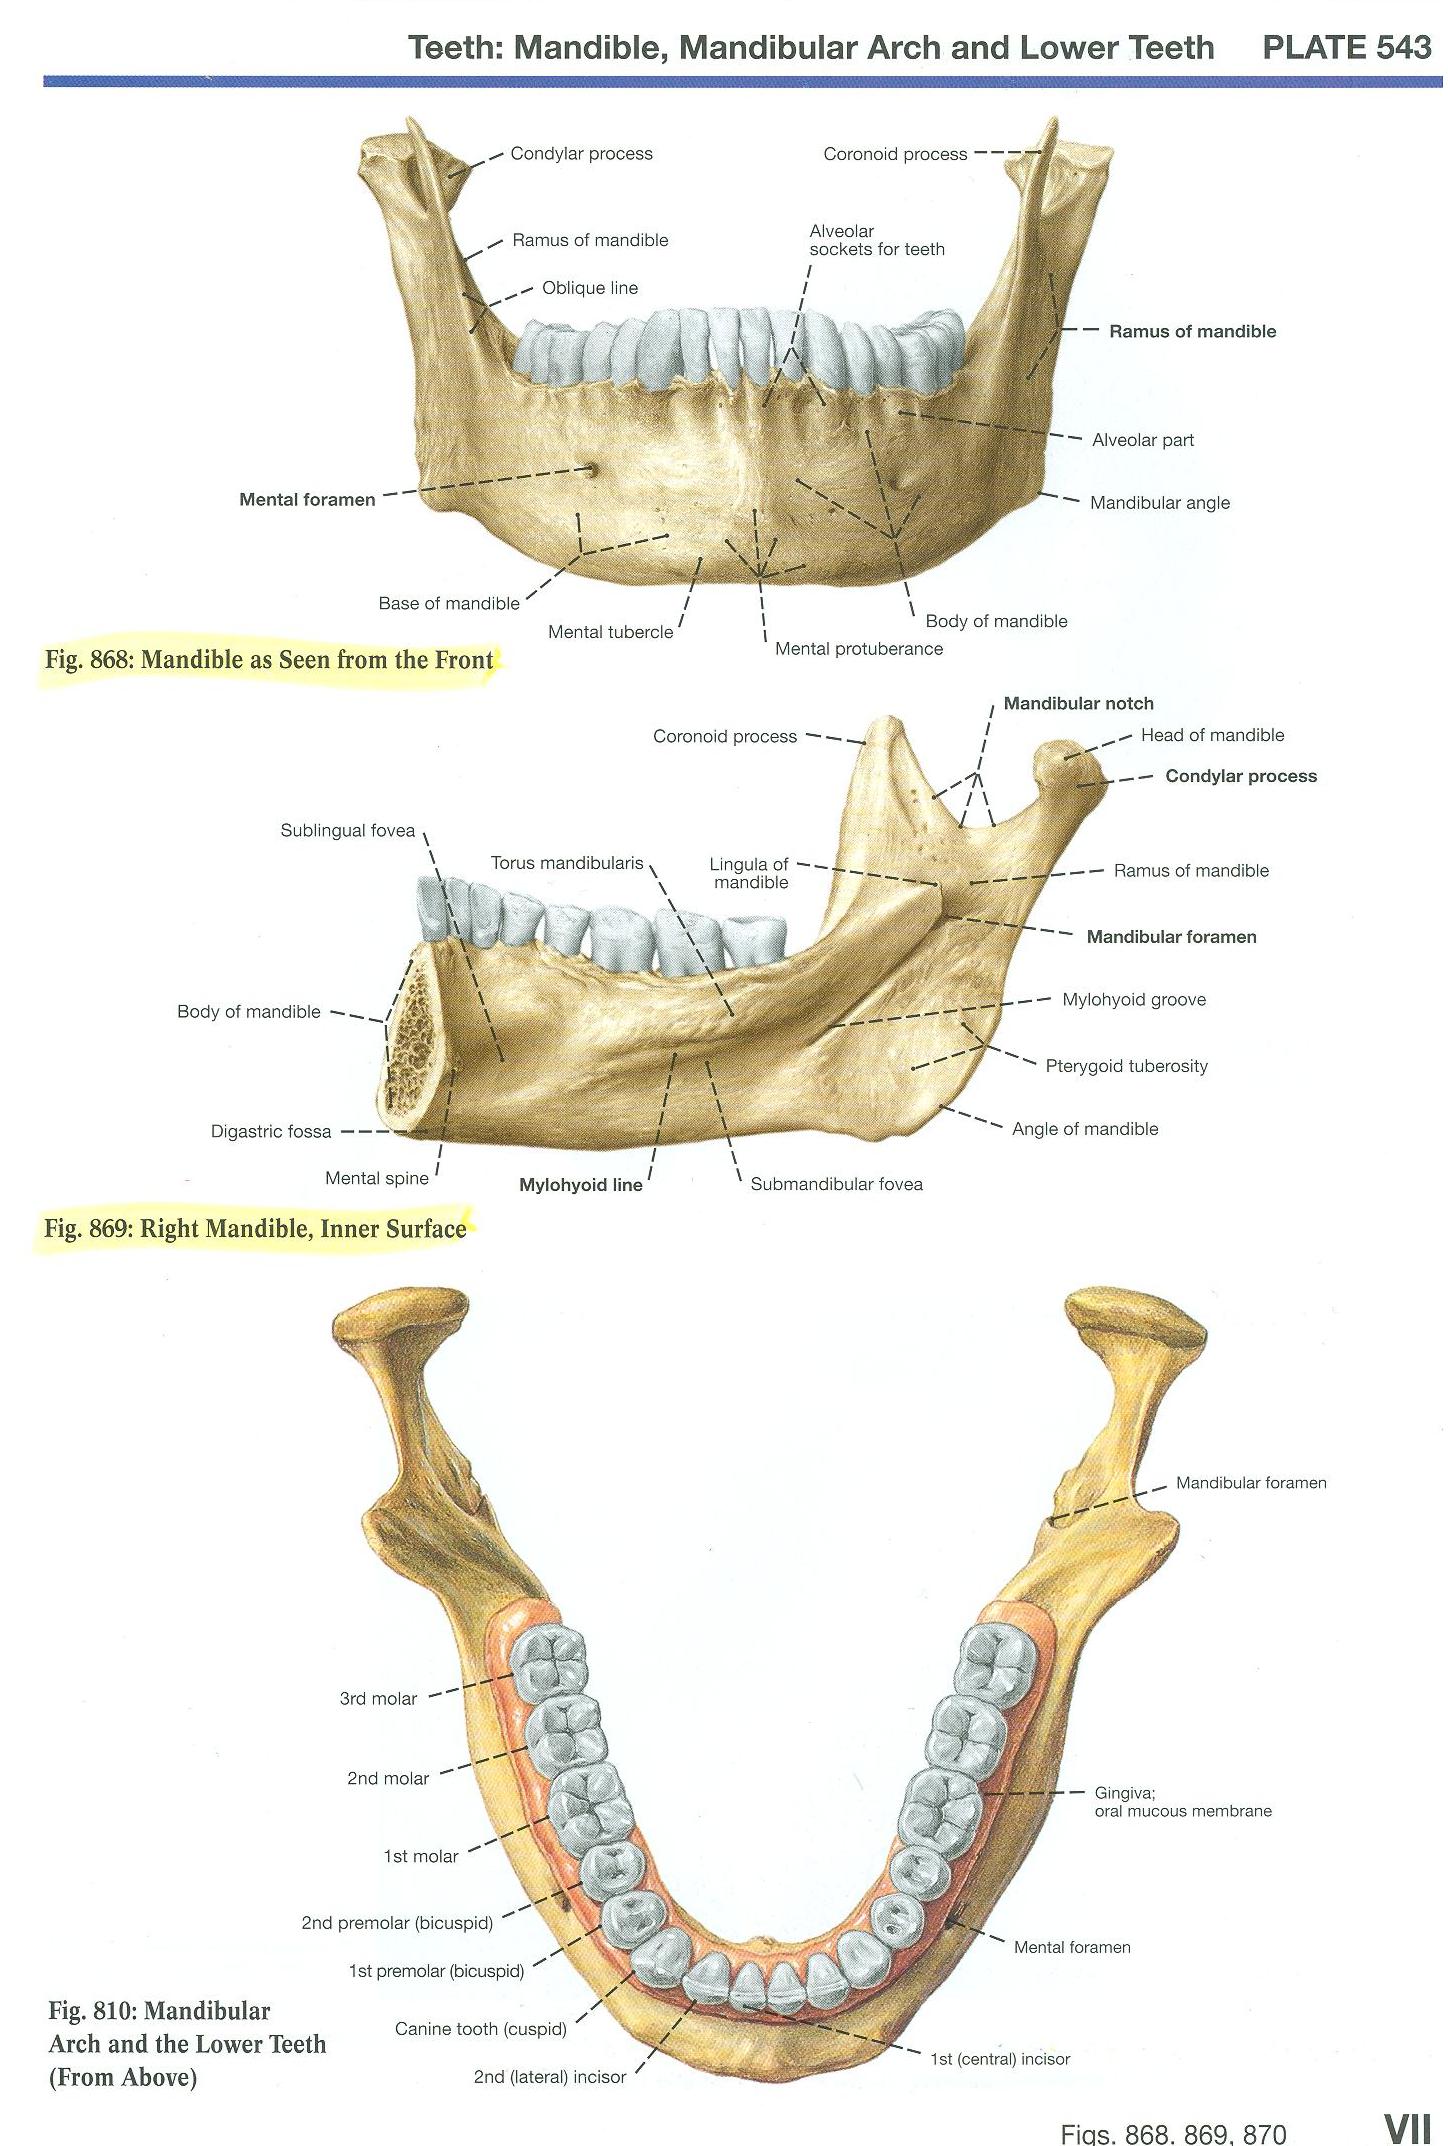
Prosection Instructions - On the bisected head:
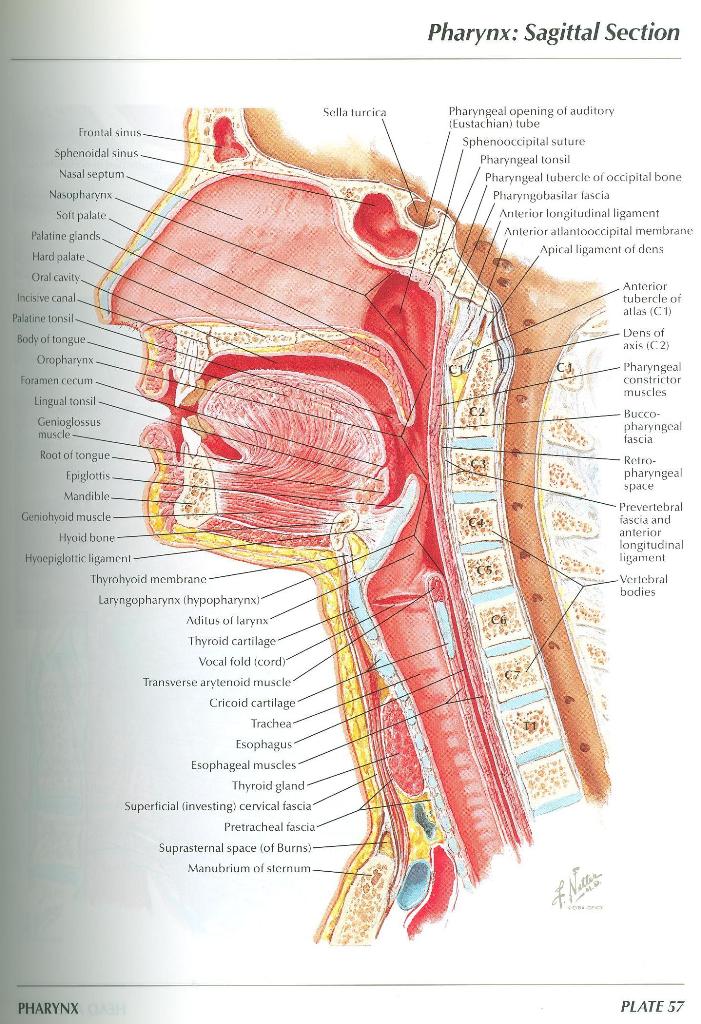
- Refer to Netter Plate 57 and Plate 525. Identify parts of the nose and nasal cavity (part of the respiratory system):
- Naris (plural, nares) - External opening of the nose. They are separated from each other by the lower border of the nasal septum.
- Each nasal cavity begins at the naris and extends back to the choana (plural, choanae), the opening into the nasopharynx
- The nasal septum, comprised of cartilage and bone and covered by mucous membrane, separates the two nasal cavities. Frequently the nasal septum is deviated to one side.
- Identify the hard palate and soft palate, which separate the nasal cavity from the oral cavity (Netter 57).
- In the oral cavity (mouth), identify
- Incisors, if present, embedded in the bony sockets of the maxilla and mandible
- Tongue - tip, body and root. The tongue is highly muscular and covered by a mucous membrane. The anterior two thirds of the tongue is freely movable and attached to the floor of the oral cavity.
- The pharynx extends from the base of the skull to the inferior border of the cricoid cartilage (level of the C6 vertebra).
It is the continuation of the respiratory and digestive systems posterior to the nasal, oral, and laryngeal cavities.
Identify the 3 parts of the pharynx (Netter 57):
- The nasopharynx is posterior to the choanae and superior to the soft palate.
- The oropharynx is posterior to the tongue between the soft palate and the epiglottis.
- The laryngopharynx is continuous with the oropharynx at the upper border of the epiglottis and narrows rapidly below at the level of the cricoid cartilage to become continuous with the esophagus.
- Identify the larynx anterior to the laryngopharynx extending from the epiglottis superiorly to the lower border of the cricoid cartilage inferiorly where it becomes continuous with the trachea.
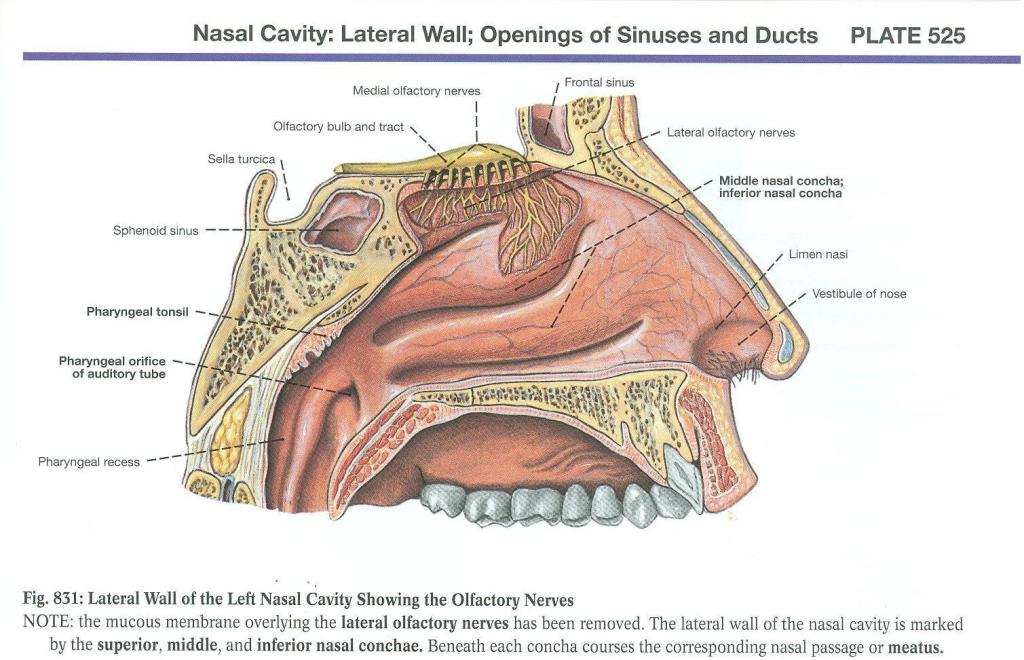
Prosection Instructions - On the pharynx/larynx prosections:
(Clemente 893):
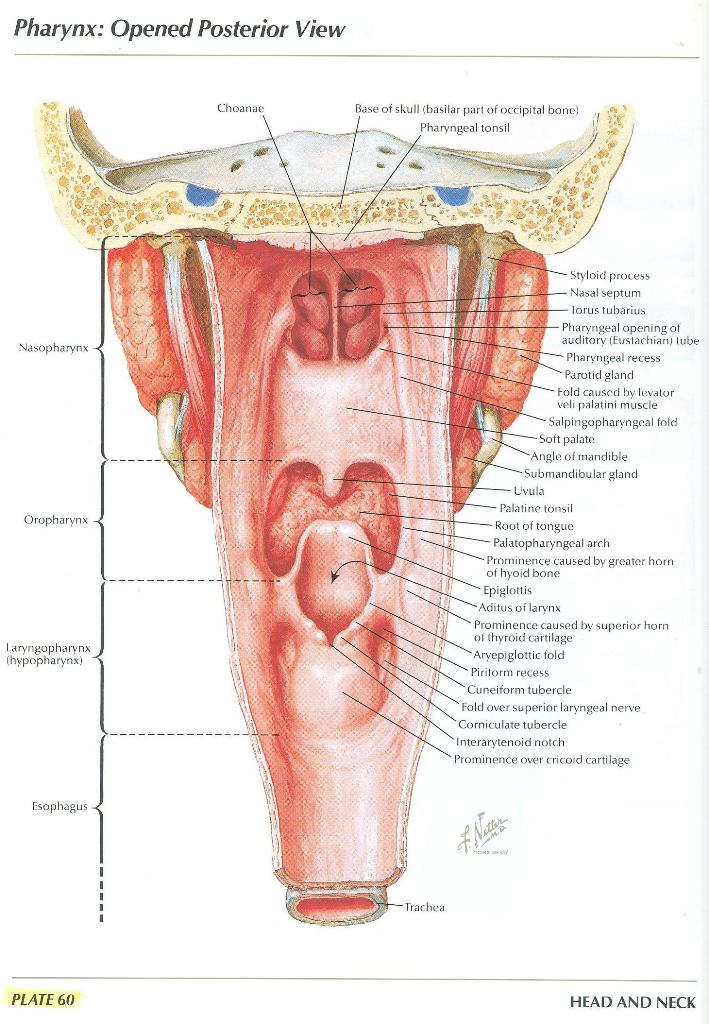
- Refer to Netter Plate 60, Plate 552, Plate 539, Plate 61, Plate 553
- On the dorsum of the tongue (Clemente 860), identify
- The tip and body of the tongue, which is separated from the root of the tongue by a V-shaped furrow, the sulcus terminalis.
- A row of papillae containing taste buds lying immediately anterior to the sulcus terminalis; these are the circumvallate papillae
- The pharynx has been opened by a posterior longitudinal incision. Identify the 3 parts of the pharynx (Netter 60; Clemente 893):
- The nasopharynx
- The oropharynx
- The laryngopharynx
- Identify the continuation of the laryngopharynx as the esophagus at the lower border of the cricoid cartilage
- On the prosections where the mucous membranes and connective tissues have been removed (Netter 61; Clemente 895) observe that the pharyngeal walls consist of circularly and longitudinally oriented muscles. The details of the musculature of the pharynx will be studied in the Brain, Mind and Behavior block.
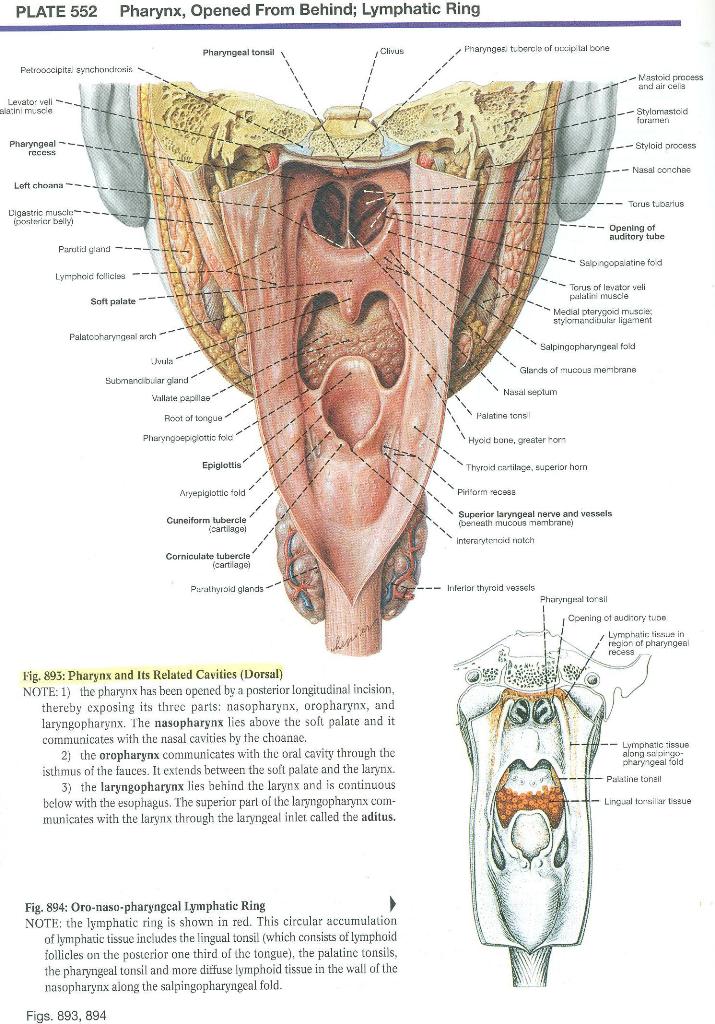
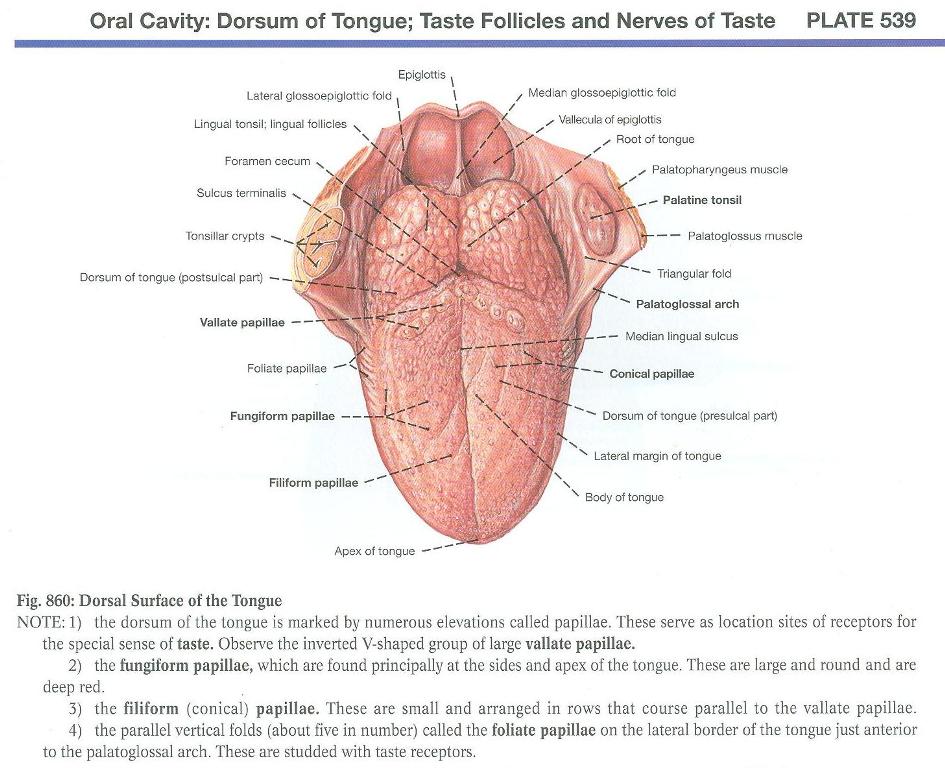
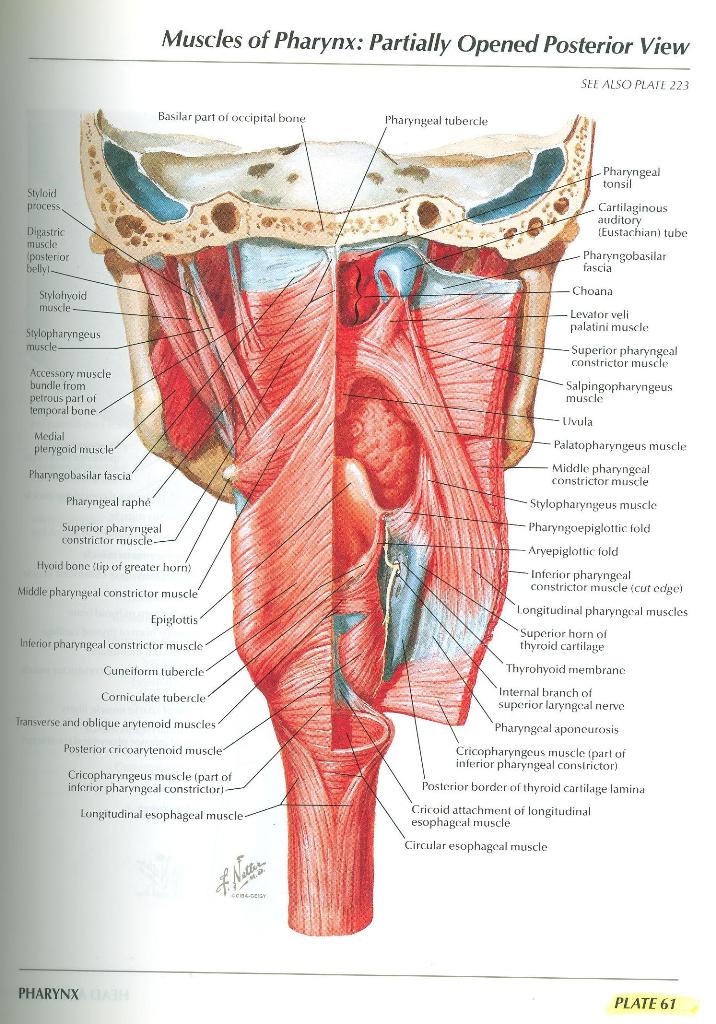
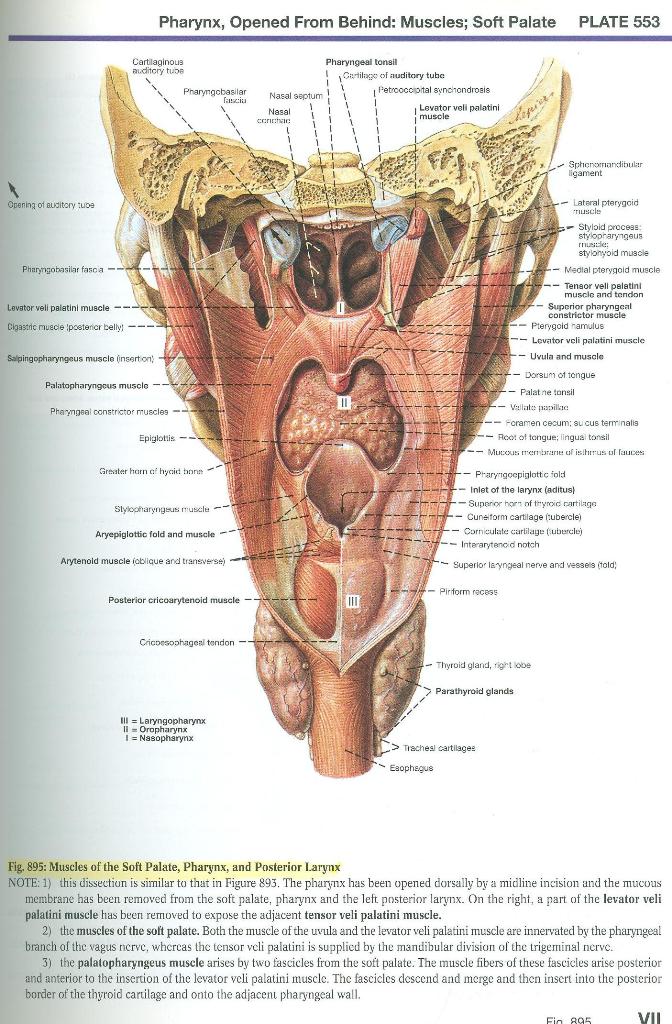
Prosection Instructions - Salivary glands:
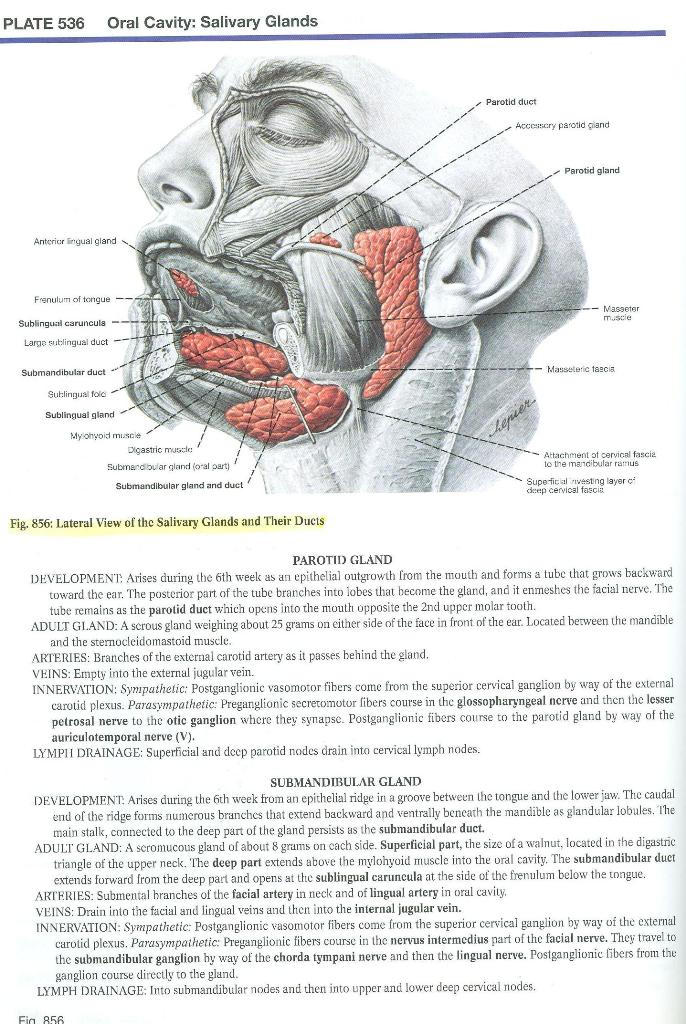
- Refer to Plates 536 and 532
- On yourself, or a volunteer, palpate the (Clemente 856)
- Parotid glands in front of the ear between the mandible and the sternocleidomastoid muscle. The parotid ducts empty into the mouth opposite the 2nd upper molar teeth
- Submandibular glands below the body and angle of the mandible. The submandibular ducts open at the sublingual caruncula (Clemente 847) at the side of the frenulum below the tongue.
- With the mouth open and the tip of your tongue touching the hard palate, identify (Clemente 847)
- The sublingual caruncula for the openings of the submandibular ducts
- The sublingual folds within which are the sublingual glands. The ducts of the sublingual glands open all along the sublingual folds.